DIY Entryway Bench with Cubbies: Step-by-Step Plans
SMALL SPACES & STORAGE
DIY Entryway Bench with Cubbies: Step-by-Step Plans
By Practical Wood Plans · Verify actual plywood thickness before cutting fitted parts.
These entryway bench with cubbies plans build a
compact 48-inch seat with three open shoe compartments. The bench fits a
hallway, mudroom, or apartment entry where closed storage would feel
bulky. A raised bottom shelf keeps footwear off the floor, two dividers
support the seat, and a back rail prevents the case from racking. The
finished project measures 48 in. wide × 15 in. deep × 18 in. high and is
built from one sheet of 3/4-in. plywood.
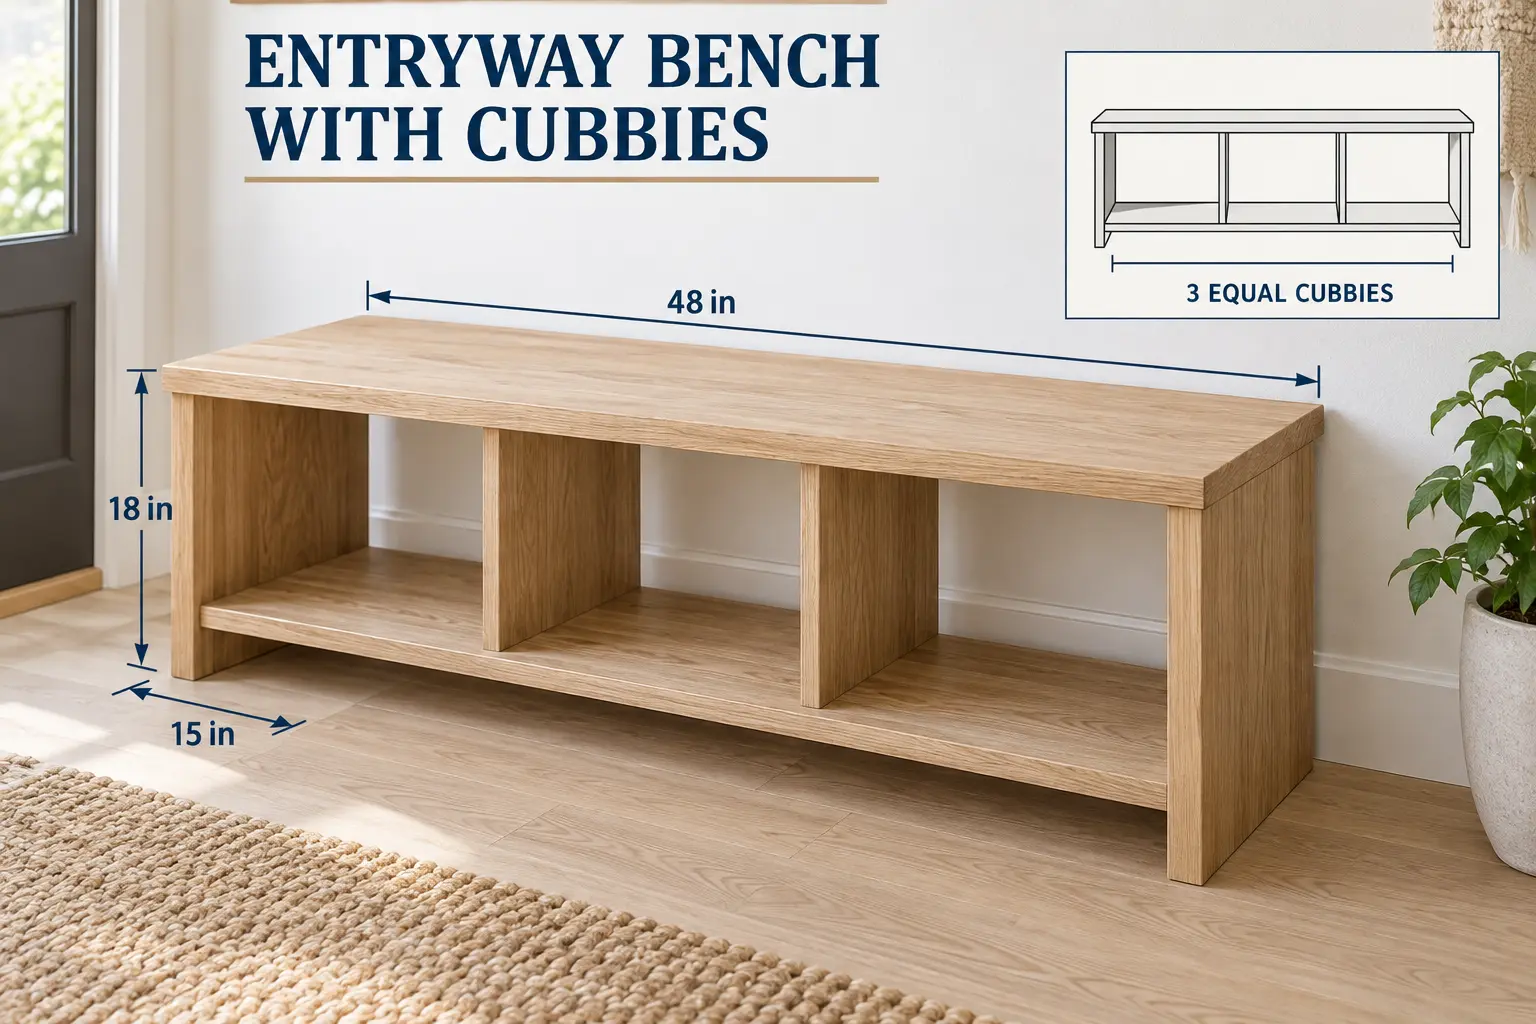
Entryway Bench with Cubbies Plans: Project Overview
| Specification | Measurement |
|---|---|
| Overall width | 48 in. |
| Overall height | 18 in. |
| Overall depth | 15 in. |
| Clear cubby width | 15 in. each |
| Clear cubby height | 13 1/2 in. |
| Bottom shelf height | 3 in. below shelf; shelf top at 3 3/4 in. |
| Difficulty | Beginner–Intermediate |
| Build time | One weekend, excluding finish cure time |
| Main material | 3/4-in. cabinet-grade plywood |
Plan Overview
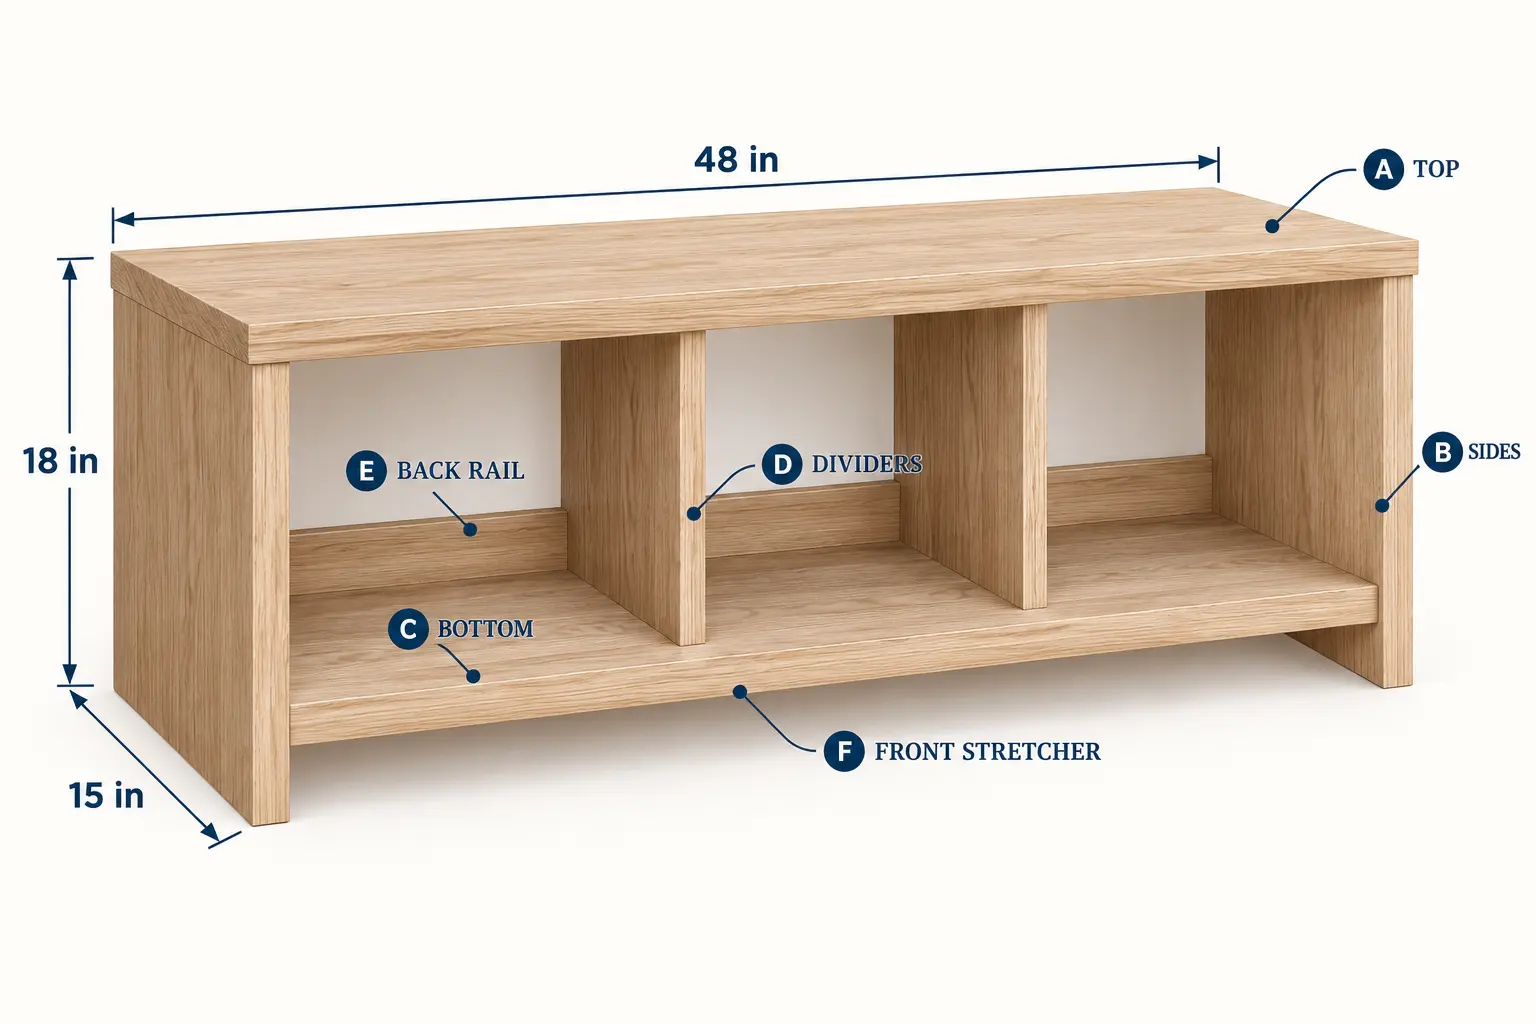
Every measurement in these entryway bench with cubbies plans follows one fixed design. The top is flush with the back of the case and projects 3/4 in.
beyond the front. Two full-depth dividers create three equal 15-in.
openings and transfer sitting loads directly to the bottom shelf.
Materials and Hardware
| Material | Quantity | Size / Description |
|---|---|---|
| Cabinet-grade plywood | 1 sheet | 3/4 in. × 4 ft. × 8 ft. |
| Coarse-thread pocket screws | About 36 | 1 1/4 in. |
| Wood glue | 1 bottle | Interior woodworking glue |
| Edge banding | As needed | For exposed plywood edges |
| Anti-tip strap or bracket | 1 | Rated furniture restraint |
| Wall fastener | 1 | Appropriate for a wall stud and strap |
| Sandpaper | — | 120, 180, and 220 grit |
| Finish | — | Paint, hard-wax oil, or polyurethane |
Cut List
All dimensions are finished sizes. Measure the actual plywood
thickness before cutting. If it is thinner than 3/4 in., keep the 48 ×
15 × 18-in. outside dimensions and recalculate the lengths of parts C,
E, and F before cutting them.
| Part | Qty. | Component | Finished Size |
|---|---|---|---|
| A | 1 | Seat top | 48 × 15 in. |
| B | 2 | Side panel | 14 1/4 × 17 1/4 in. |
| C | 1 | Bottom shelf | 46 1/2 × 14 1/4 in. |
| D | 2 | Cubby divider | 14 1/4 × 13 1/2 in. |
| E | 1 | Back rail | 46 1/2 × 4 in. |
| F | 1 | Front stretcher | 46 1/2 × 3 in. |
Exploded View
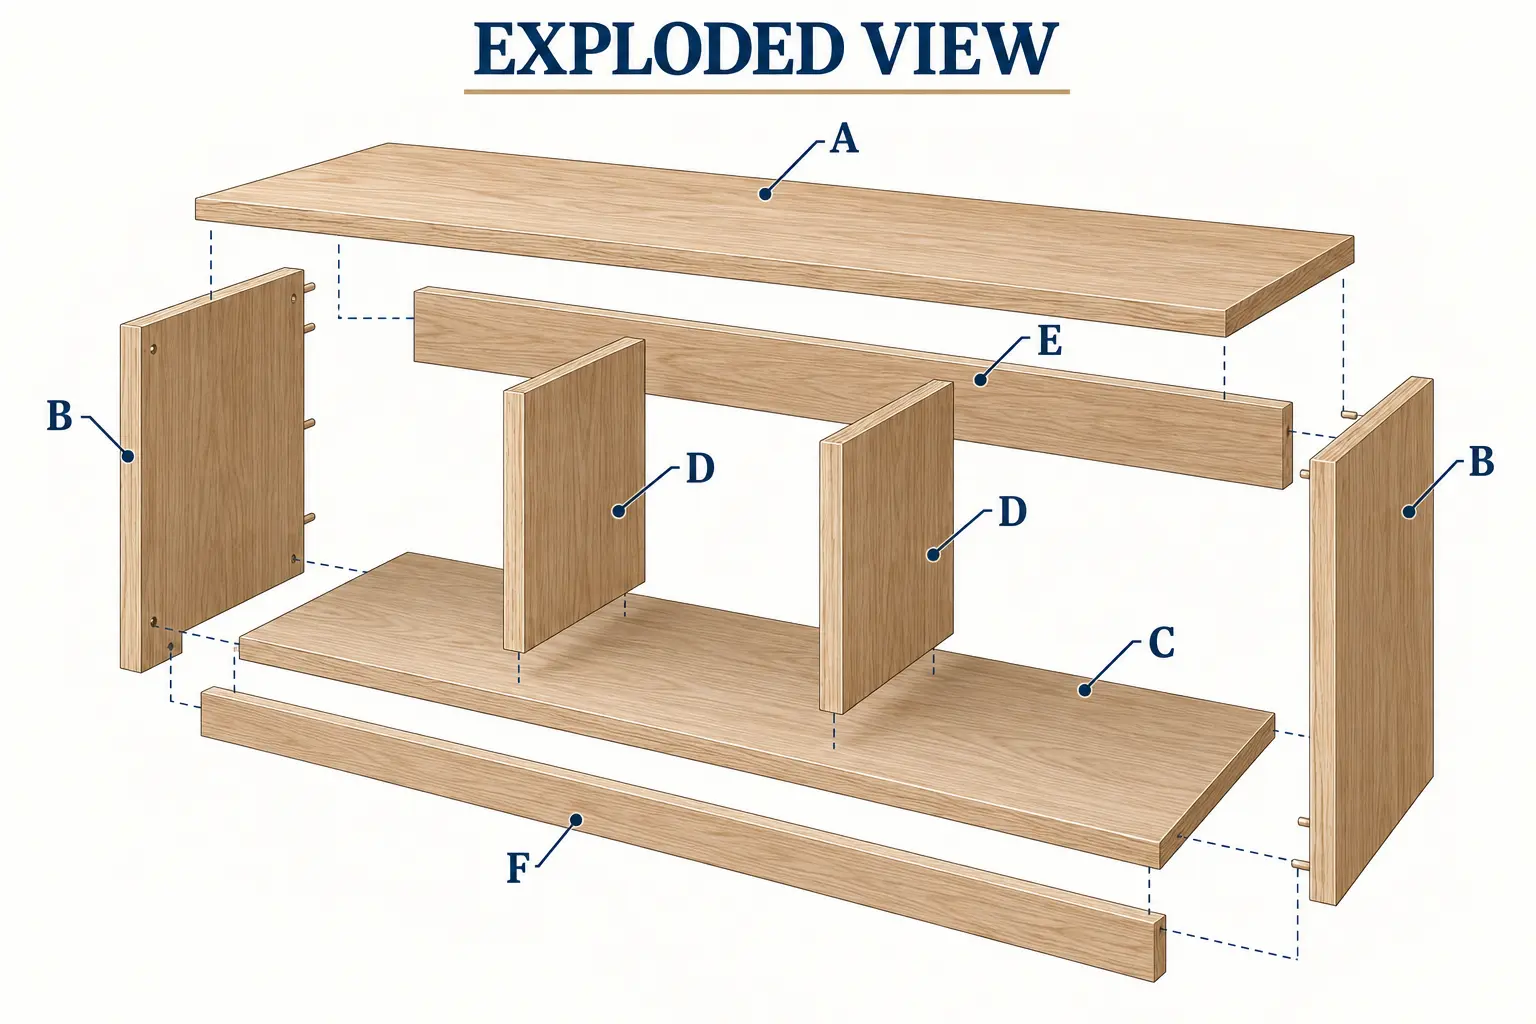
Parts B hold the case width. Part C spans between them. Parts D sit
on C, while E and F resist racking at the back and lower front. Part A
is installed last so every pocket screw remains accessible during
assembly.
Building Instructions
Step 1 — Cut and Label the
Parts
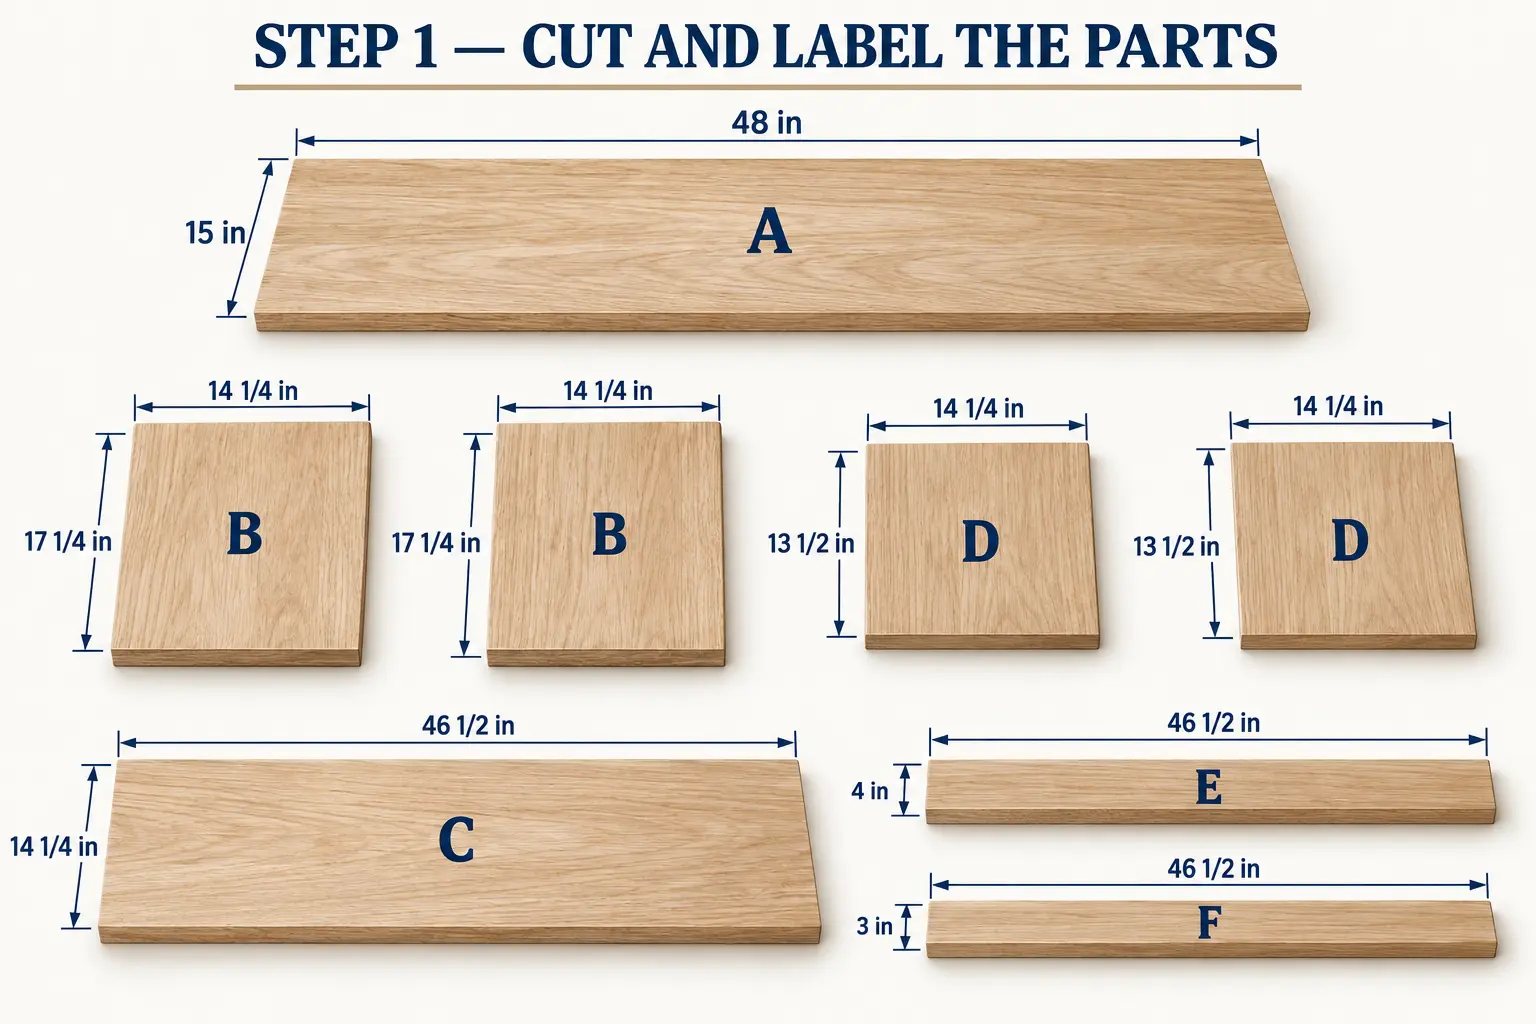
Cut parts A–F to the Cut List. Square one factory edge before making
parallel cuts, then label every part. Apply edge banding to the front
edges of A, B, C, and D before assembly. Drill pocket holes on the
hidden faces shown in the following steps.
Step 2 — Assemble the
Sides and Bottom
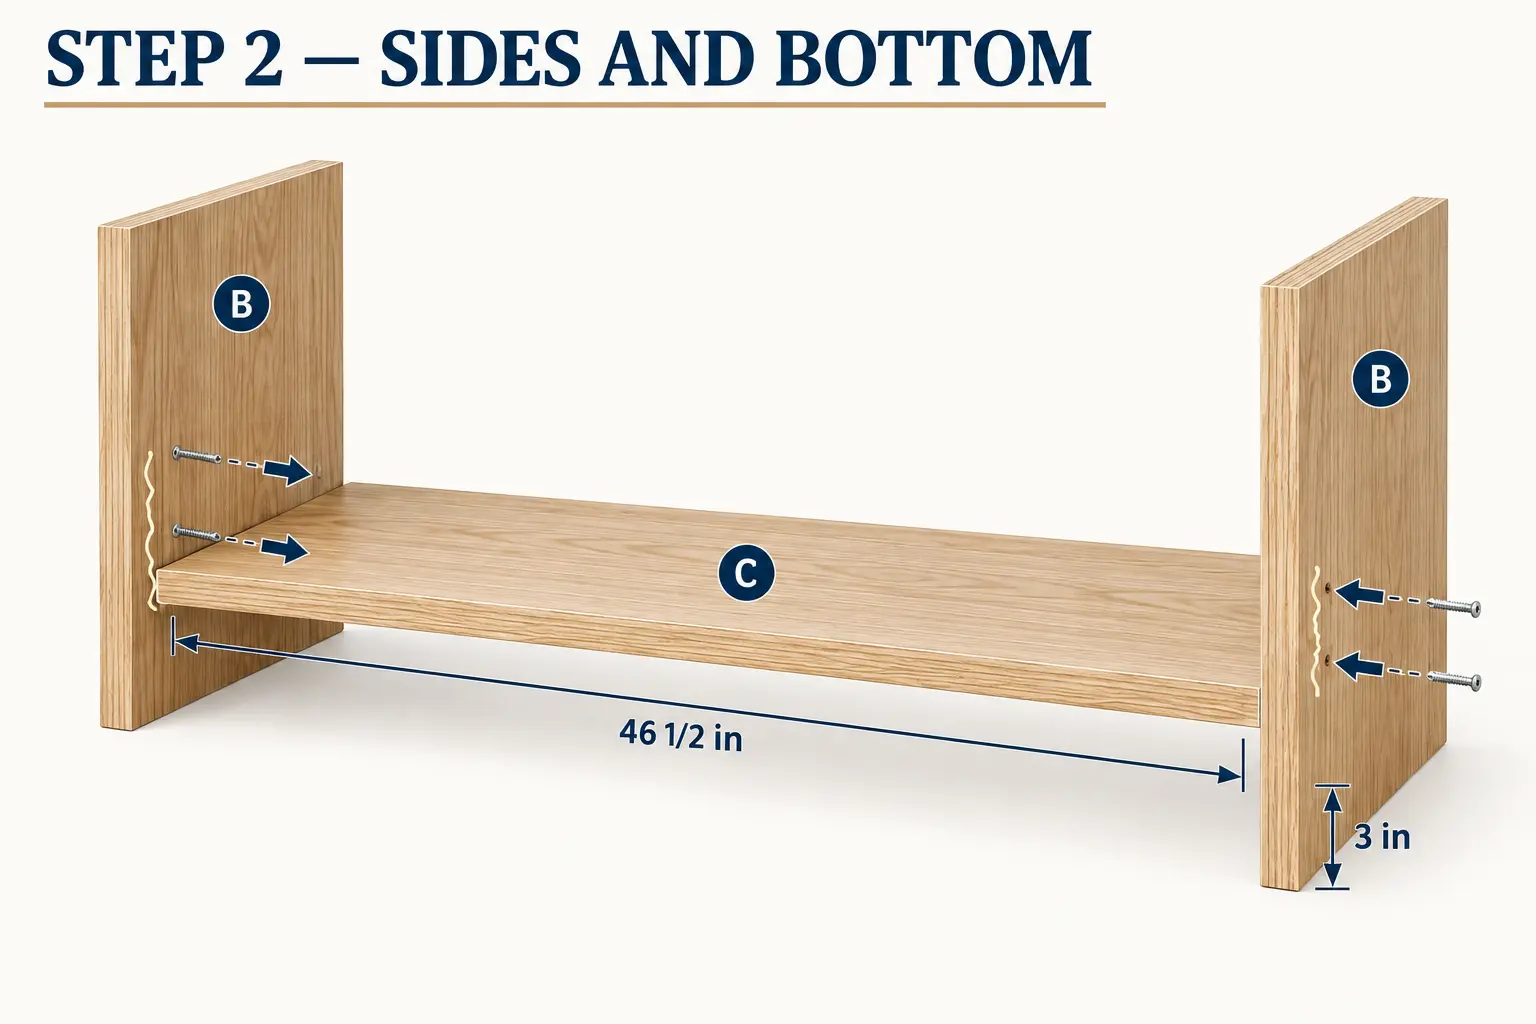
Place bottom shelf C between side panels B with its bottom face 3 in.
above the floor. Its top face will be 3 3/4 in. high. Apply glue, clamp
the assembly square, and drive 1 1/4-in. pocket screws from the
underside of C into both side panels.
Step 3 — Install the Cubby
Dividers
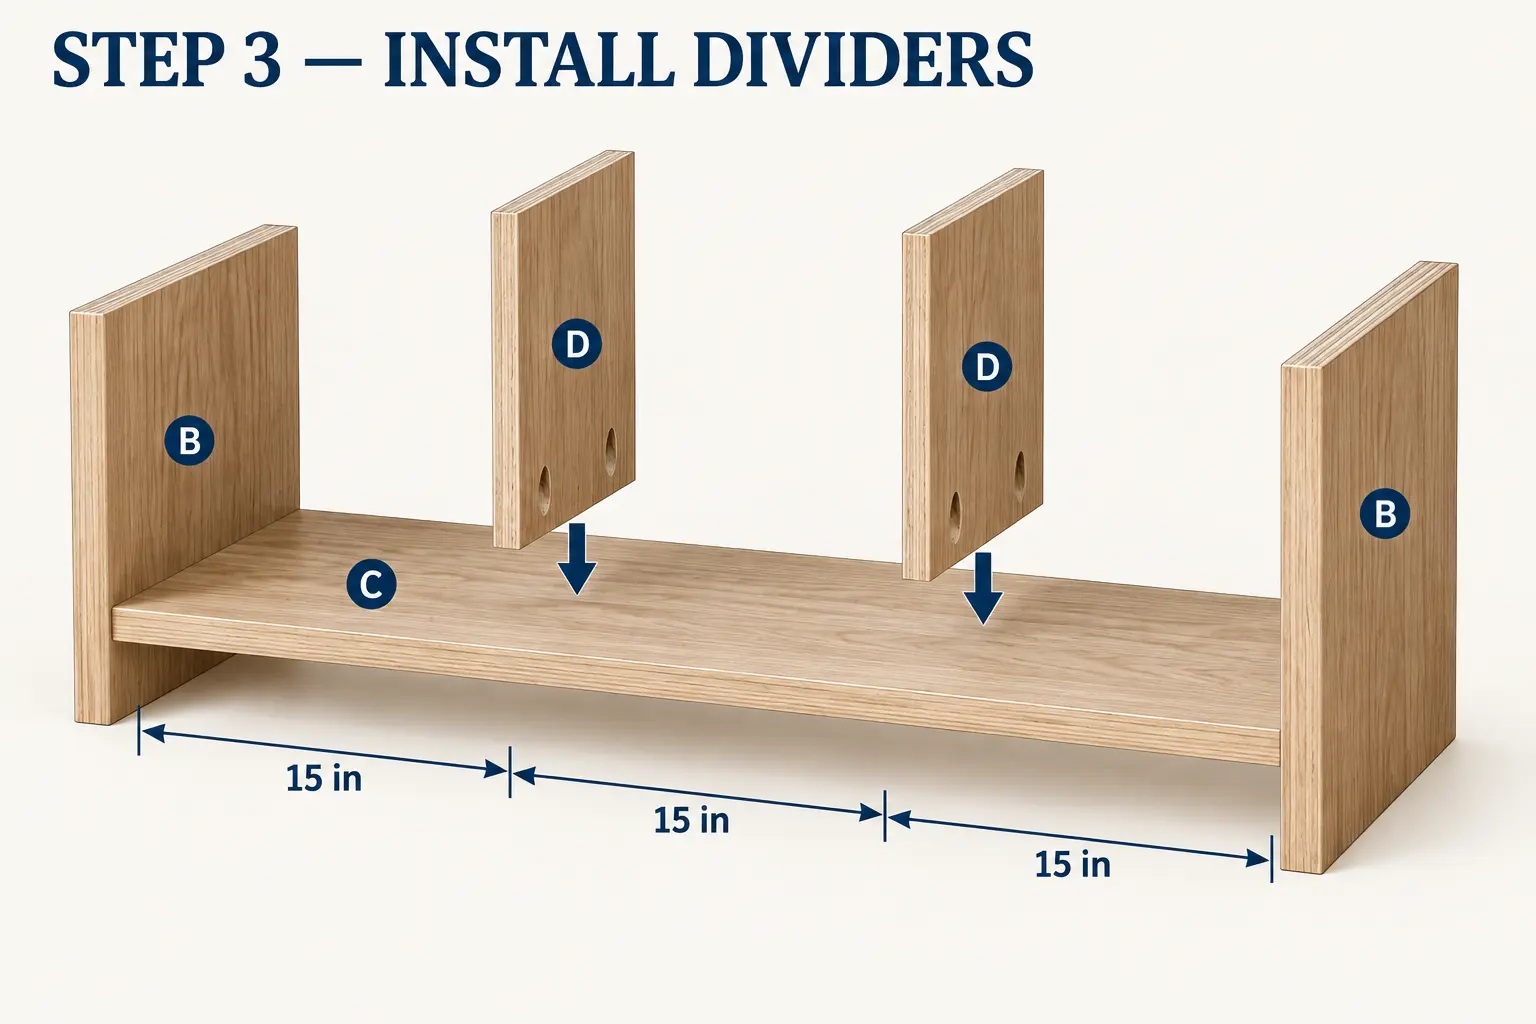
Stand both D dividers on C with their front edges flush. Measure from
the inside face of the left B panel: the first divider begins at 15 in.,
and the second begins 30 3/4 in. from that same face. Confirm three
clear 15-in. openings, then glue and fasten each divider to C with two
hidden 1 1/4-in. pocket screws.
Step 4 — Add the Back Rail
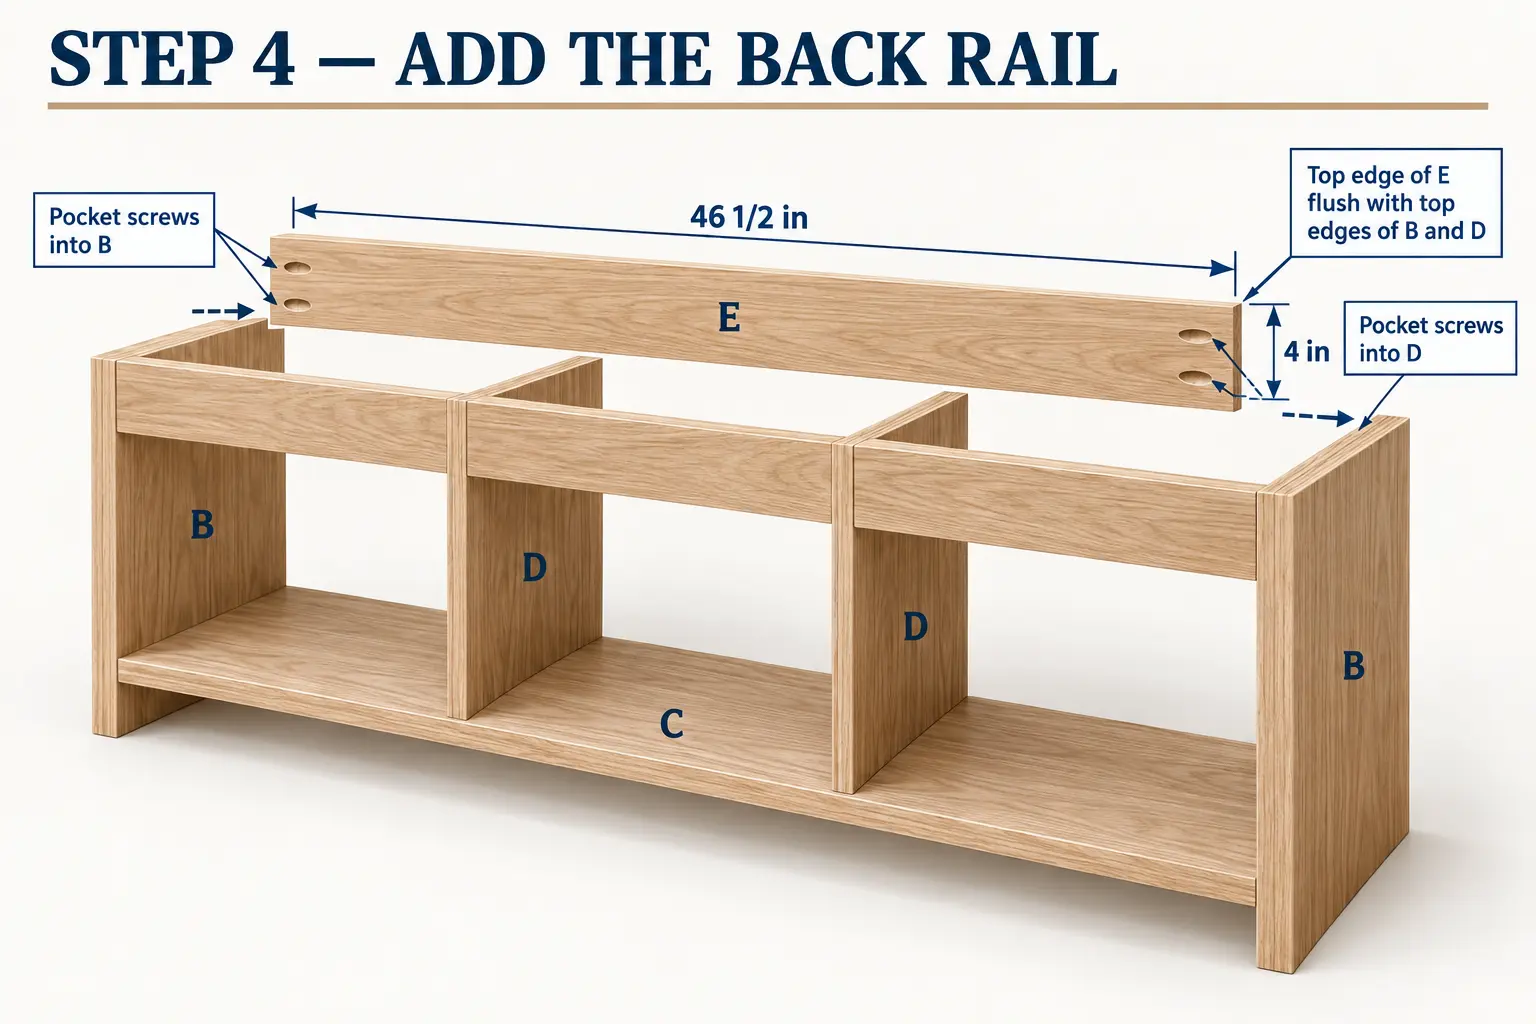
Fit E between the side panels at the back. Its upper edge must be
flush with the tops of B and D. Apply glue and secure E to both sides
with two pocket screws at each end. Add upward-facing pocket holes in E
for attaching A later.
Step 5 — Add the Front
Stretcher
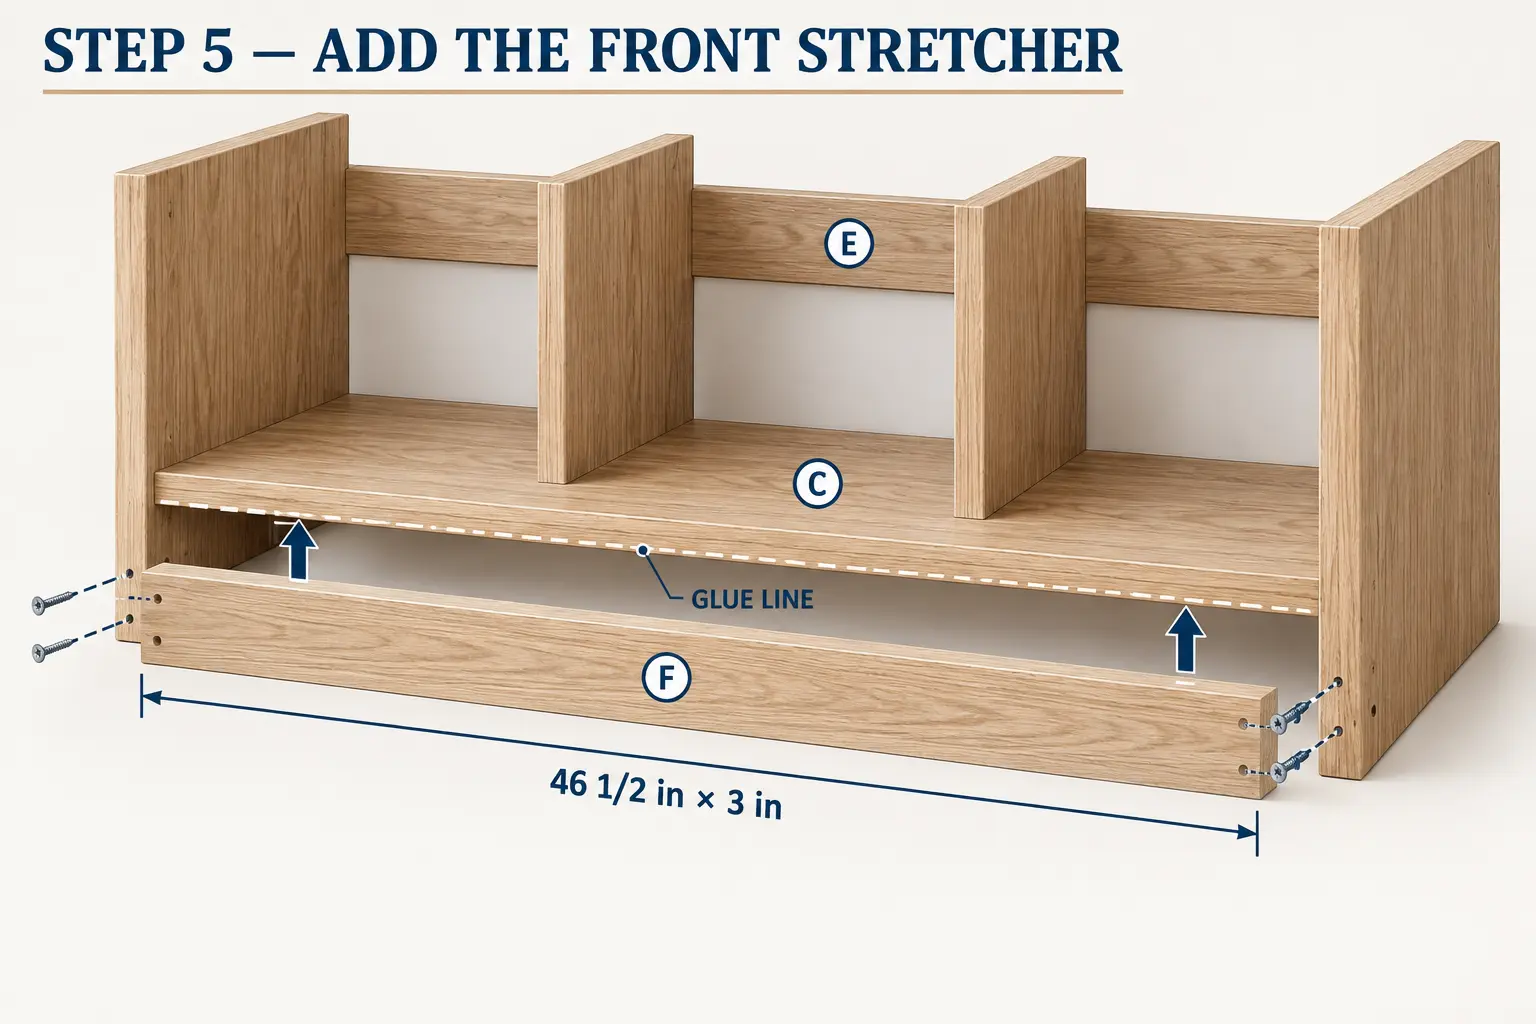
Position F between the side panels directly beneath the front edge of
C. Keep its face flush with the front edges of B. Glue the joint, clamp
F against C, and fasten its ends to B with pocket screws. Drive three
evenly spaced 1 1/4-in. screws upward through F into C.
Step 6 — Attach the Seat Top
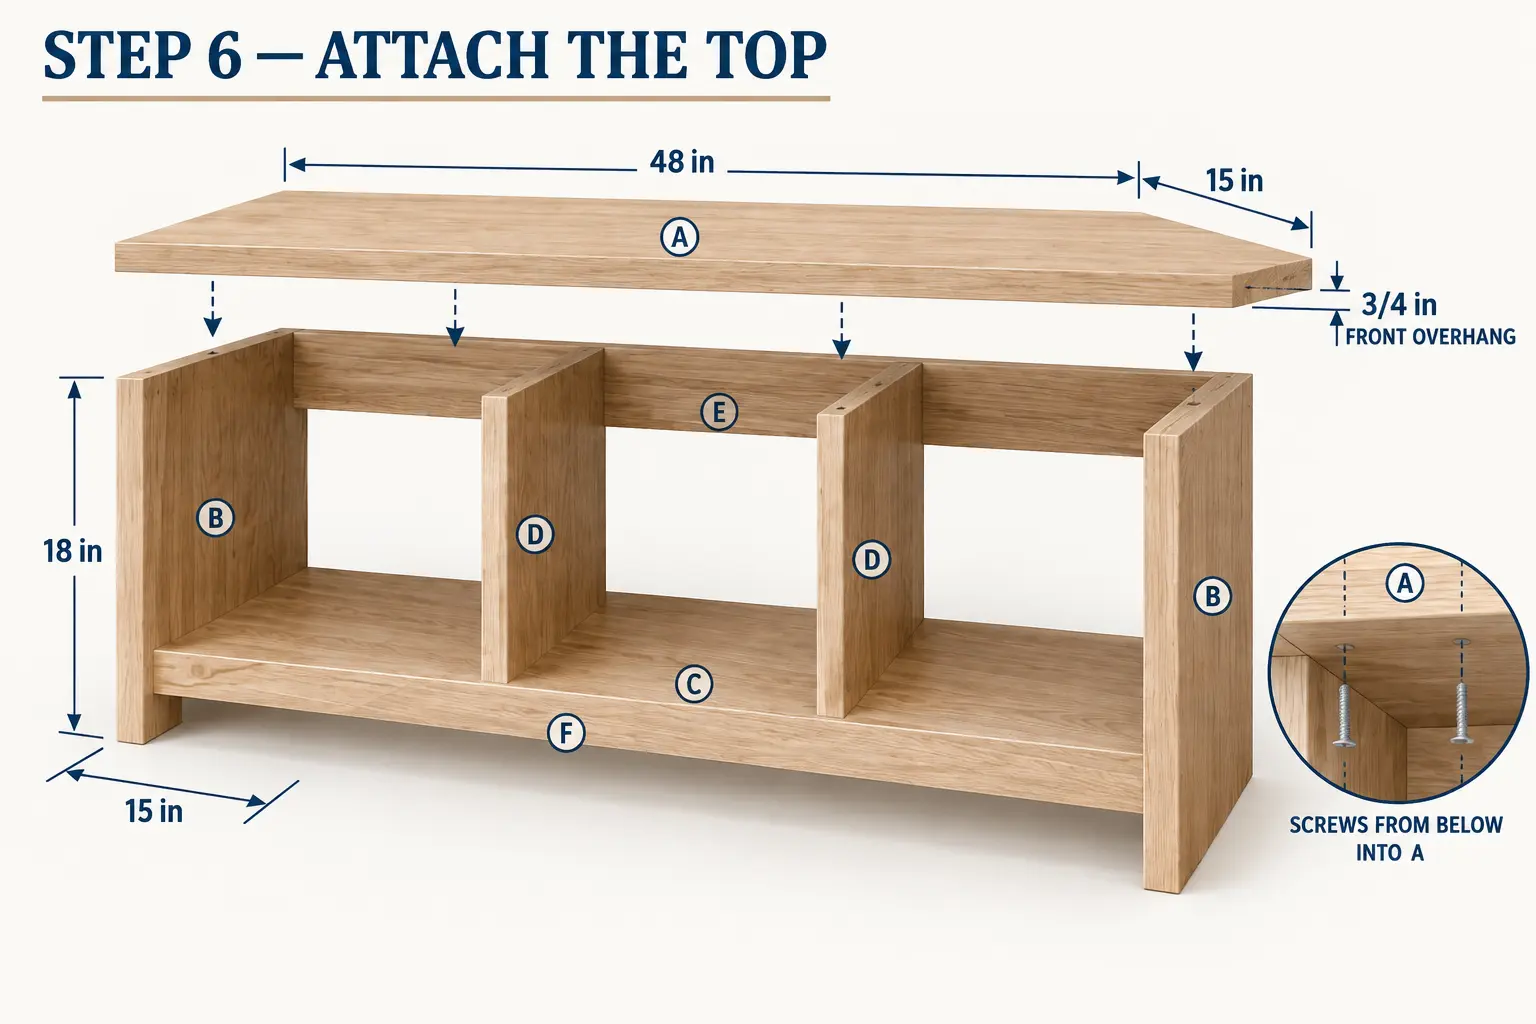
Place A on the case with its rear edge flush and a 3/4-in. overhang
at the front. The side edges remain flush with B. Check both diagonals
before fastening. Drive 1 1/4-in. pocket screws upward through B, D, and
E into A; do not drive screws through the visible top face.
Wall Anchor Detail
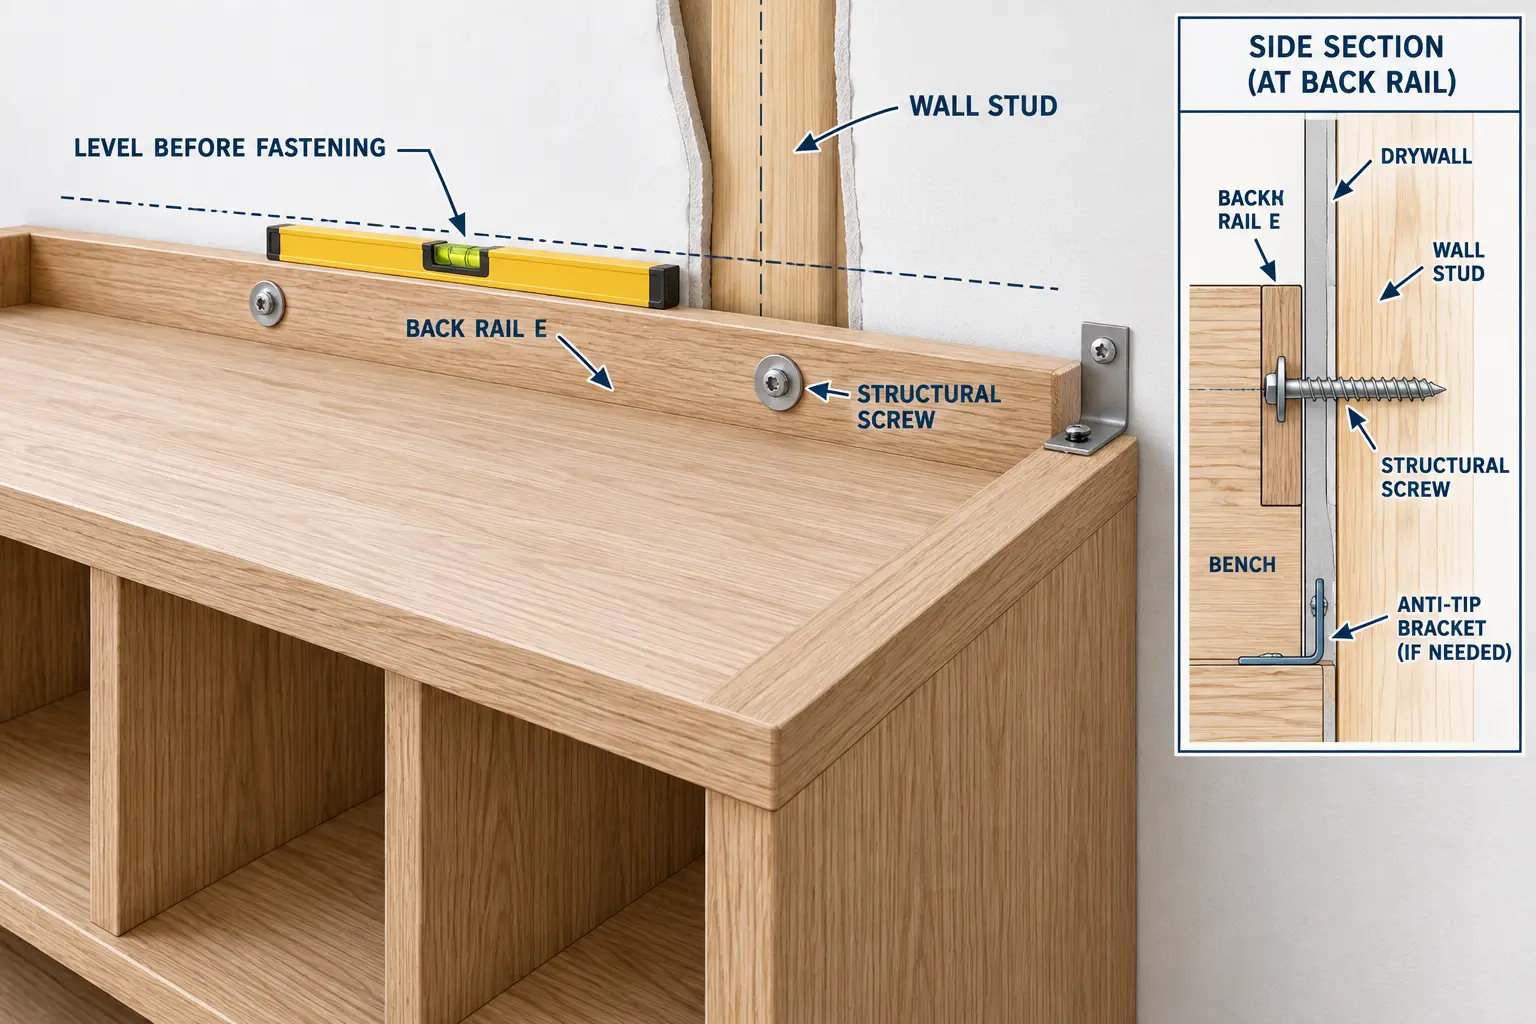
Use an anti-tip strap when children may climb on the bench or pull
against it. Locate a wall stud, fasten the strap to E, and secure the
wall end with a structural screw appropriate for the wall. The restraint
should limit forward movement without lifting the rear of the bench.
Front, Side, and Top Views
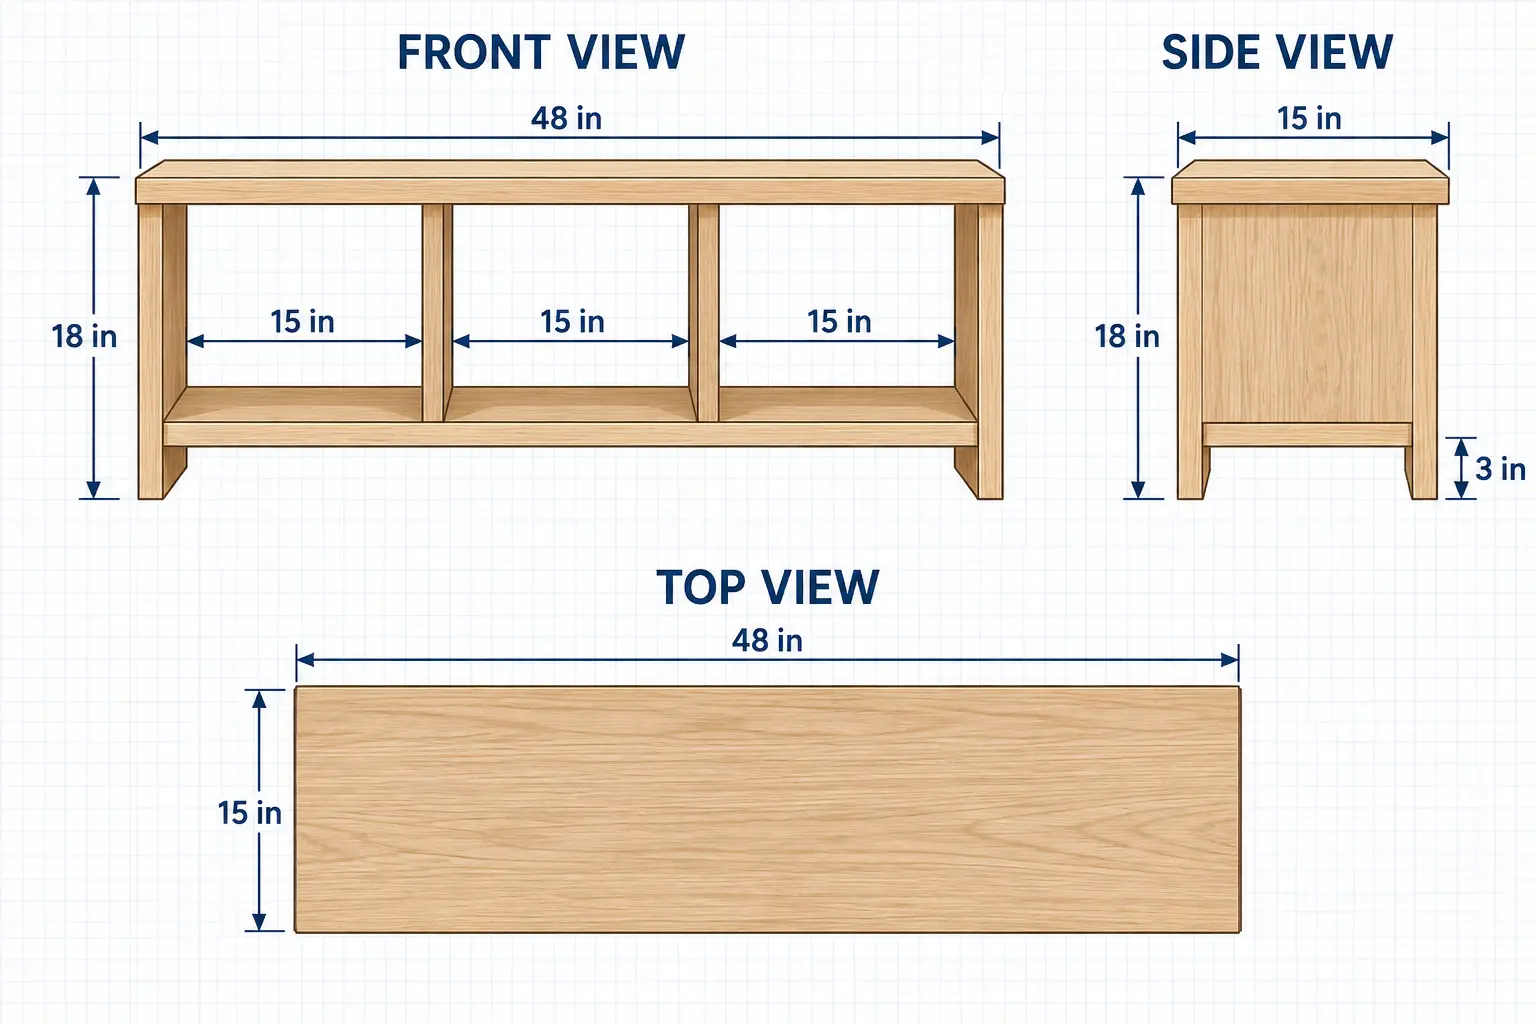
Use these views to confirm the finished envelope before applying
finish: 48 in. wide, 15 in. deep, and 18 in. high. Place the bench on a
flat surface and verify that all four lower corners contact the
floor.
Finishing
Ease exposed plywood edges with 120-grit paper without rounding the
mating surfaces. Fill visible defects, then sand the complete bench with
180 grit and finish with 220 grit. Vacuum the cubbies and wipe away dust
before applying the chosen finish. Use two or three thin coats of
water-based polyurethane for a clear, durable surface, or prime the
plywood edges before painting. Allow the finish to cure fully before
placing shoes inside or sitting on the top.
Finished Project
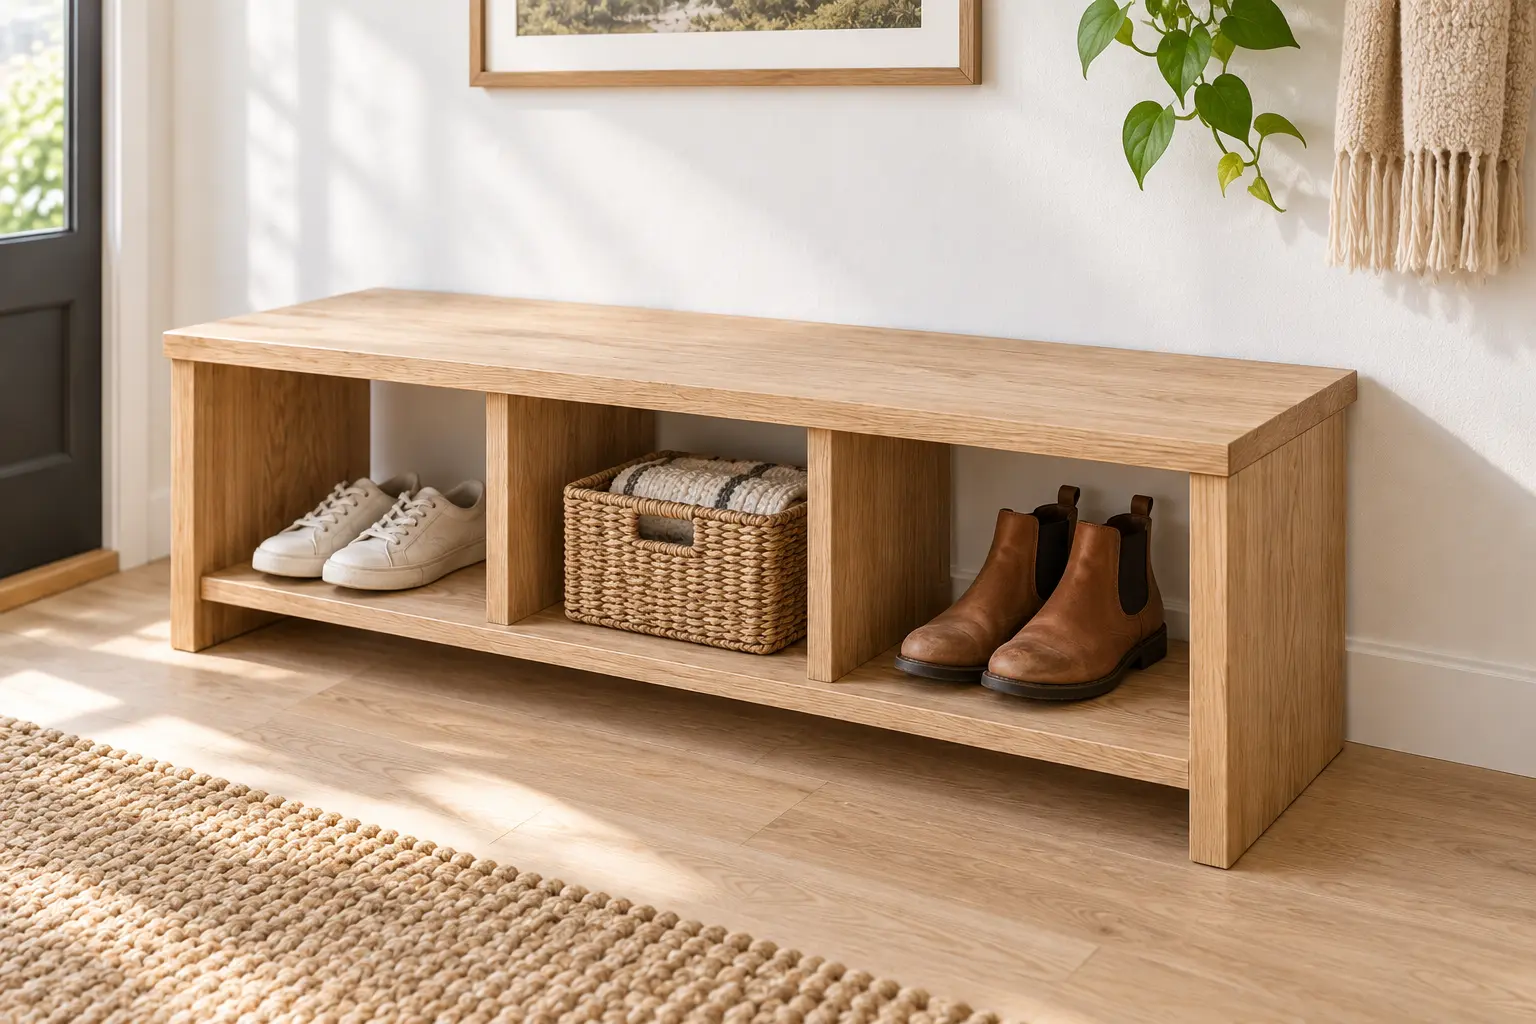
These entryway bench with cubbies plans produce a 48-in. seating surface and three open
15-in. shoe compartments. Add a removable cushion only after confirming
that the final seat height remains comfortable and the cushion cannot
slide during use.
Build Notes
- Confirm the real plywood thickness before cutting C, E, and F.
- Keep the front edges of B, C, and D flush during assembly.
- Check diagonal measurements before attaching A.
- Predrill near plywood edges and stop driving when the screw head
seats. - Finish the inside faces before assembly if access will be difficult
later. - Anchor the bench when children may climb or pull on it.
Frequently Asked Questions
Can I make the bench
narrower?
Yes. Keep parts B and D unchanged. Reduce A, C, E, and F by the same
amount, then recalculate the three clear cubby widths before
cutting.
Can I use MDF instead of
plywood?
Plywood is preferred because it holds screws better and tolerates
entryway moisture. MDF can be used for a painted bench, but it needs
careful edge sealing and suitable joinery.
Why is the bottom shelf
raised 3 inches?
The clearance keeps the cubbies visually lighter and makes the floor
beneath the front edge easier to clean. Part F supports the raised shelf
and prevents the case from racking.
Does the bench
need to be attached to the wall?
The bench is low, but an anti-tip restraint is recommended where
children are present or where users may pull on the seat while
standing.