How to Build a Hidden Shoe Storage Bench
Build a slim entryway bench that gives you a comfortable seat and keeps everyday shoes organized behind two tilt-out fronts.
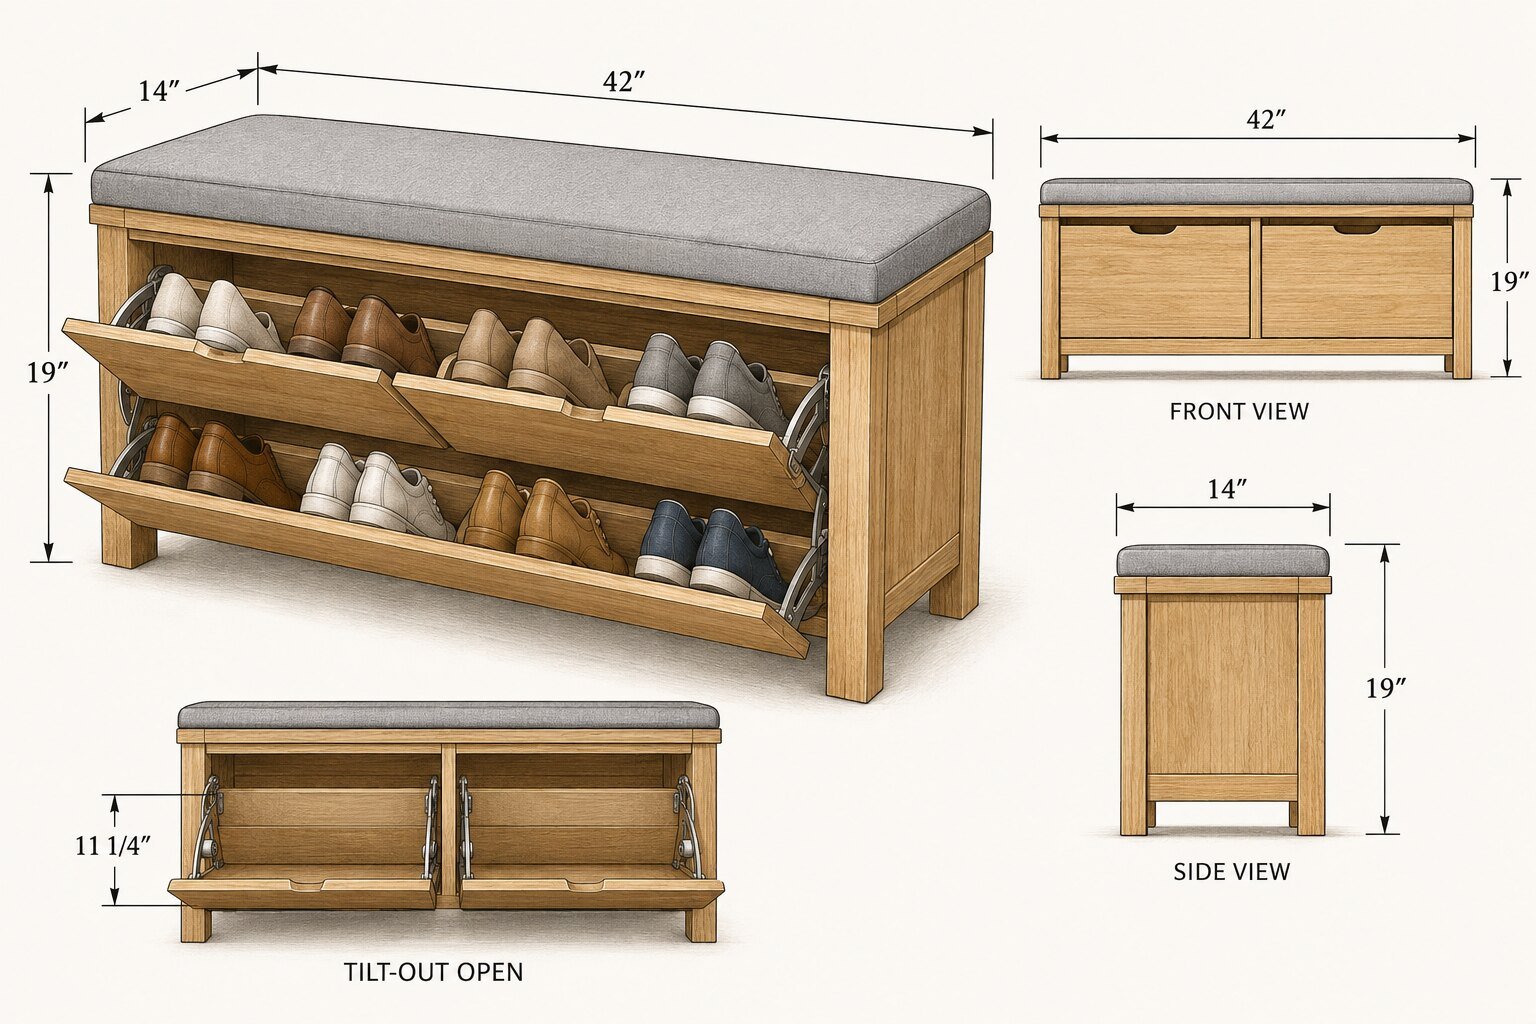
This compact bench is designed for narrow entryways. The two tilt-out compartments keep shoes organized while the reinforced top provides a practical place to sit.
Materials & Tools
- 3/4-inch cabinet-grade plywood
- 1×2 and 1×3 hardwood for the frame and trim
- Two strong tilt-out pivot hinge sets
- Wood glue and 1¼-inch pocket-hole screws
- Sandpaper in 120, 180 and 220 grit
- Durable clear finish or furniture paint
Materials for a hidden shoe storage bench
Flat cabinet-grade plywood and reliable tilt-out hardware help a hidden shoe storage bench remain square, comfortable and easy to use.
Cut List & Dimensions
| Part | Size | Qty |
|---|---|---|
| Top / Seat | 42 × 14 in | 1 |
| Side Panels | 18¼ × 13 in | 2 |
| Bottom Panel | 40½ × 13 in | 1 |
| Center Divider | 16¾ × 11¼ in | 1 |
| Tilt-Out Fronts | 20 × 11 in | 2 |
Tools
Step-by-Step Instructions
Build the outer cabinet
Cut the top, sides and bottom square. Drill pocket holes on hidden faces, spread a thin even layer of glue and assemble the cabinet on a flat surface. Check both diagonals before tightening the screws.
Accuracy check: Measure both diagonals. Matching measurements confirm that the cabinet is square.
Install the center divider
Mark the centerline, position the divider and verify that both openings remain equal. Fasten it through the bottom and from the underside of the seat.
Fit check: Use two equal spacer blocks to hold the divider while fastening.
Build the tilt-out compartments
Assemble each shallow shoe bin independently. Test the front clearance before installing the pivots, then add an internal stop so the bin cannot fall past its safe opening angle.
Movement check: Load the thickest shoes before fixing the final rail positions.
Fit, sand and finish
Dry-fit both fronts and maintain consistent gaps. Sand progressively to 220 grit, soften exposed edges and apply a finish suitable for regular entryway use.
Final check: Test both compartments repeatedly before applying the finish.
Practical Tips
- Confirm your real shoe sizes before fixing the internal rails.
- Use a full-size spacer to keep the gaps around both fronts consistent.
- Anchor the bench to the wall when children may climb on it.
- Test the tilt mechanism repeatedly before applying the final finish.
Planning the Build
Before cutting any plywood, measure the exact wall and floor area where the hidden shoe storage bench will sit. Check baseboards, door swings, heating vents and uneven floors. The finished bench is approximately 42 inches wide, 14 inches deep and 19 inches high, but the cabinet can be adjusted when every horizontal part is changed by the same amount. Keep the depth modest so the bench does not obstruct a narrow entryway.
Make a full cutting diagram before starting. Label each panel immediately after cutting and mark the finished face with painter’s tape. A straight cutting guide is useful when a table saw is unavailable. Always wear eye and hearing protection, support large sheets properly, disconnect power before changing blades or bits, and follow the instructions supplied with every tool and hinge.
How the Tilt-Out Storage Works
Each front acts as both a door and the visible face of a shallow shoe bin. The pivot point sits near the lower corners, allowing the compartment to rotate outward while remaining attached to the cabinet. Stop blocks or purpose-made tilt-out hardware prevent the front from opening too far. Test the movement with temporary screws before applying finish. Both compartments should open smoothly without rubbing the center divider or side panels.
The internal rails should hold shoes at a slight angle. Position them for the shoe sizes used in your home rather than relying on one universal spacing. Leave clearance for hinges, screw heads and the thickest pair of shoes. This small test prevents the most common problem: a compartment that closes correctly when empty but binds when loaded.
A hidden shoe storage bench can feel awkward when seat height, door clearance or compartment depth is decided without testing real shoes and the entryway path.
Common mistakes to avoid
- Building before checking the opening: walls and floors are rarely perfectly square.
- Using weak fasteners in plywood edges: drill pilot holes and use screws intended for cabinetry.
- Skipping a dry assembly: confirm the door gaps and pivot movement before glue or finish.
- Making the seat too deep: excessive depth defeats the purpose of a small-entryway project.
- Applying thick finish around moving parts: mask bearing surfaces and maintain an even clearance.
Finish and Everyday Care
A water-based polyurethane keeps light plywood looking natural and dries quickly. For a warmer appearance, use a wiping oil followed by a compatible protective topcoat. Sand exposed surfaces through the recommended grits, soften sharp edges, remove dust and test the finish on scrap from the same sheet. Allow the coating to cure fully before adding shoes or sitting on the bench.
Vacuum grit from the compartments regularly and wipe the cabinet with a slightly damp cloth. Do not soak plywood edges. Recheck pivot screws after the first weeks of use and tighten them if needed. If the bench can tip when several compartments are open, secure it to wall framing with appropriate hardware.
Inspect the hidden shoe storage bench after assembly and anchor it to verified wall framing if children may climb or several compartments can open together. For general machine and workshop hazards, consult the OSHA woodworking safety guide.
FAQ
Can the width be changed?
Yes. Keep the center divider and both doors symmetrical, and recalculate the bottom, top and front widths together.
Can solid wood replace plywood?
It can, but allow for seasonal wood movement and avoid trapping wide solid panels inside rigid cross-grain joints.