How to Build a Shoe Storage Bench with a Lift-Up Seat
SMALL SPACES & STORAGE
How to Build a Shoe Storage Bench with a Lift-Up Seat
These shoe storage bench plans create a compact 42-inch entryway bench with three ventilated cubbies and hidden storage beneath a controlled lift-up seat.
By Practical Wood Plans · Verify every dimension against your material and hardware before building.
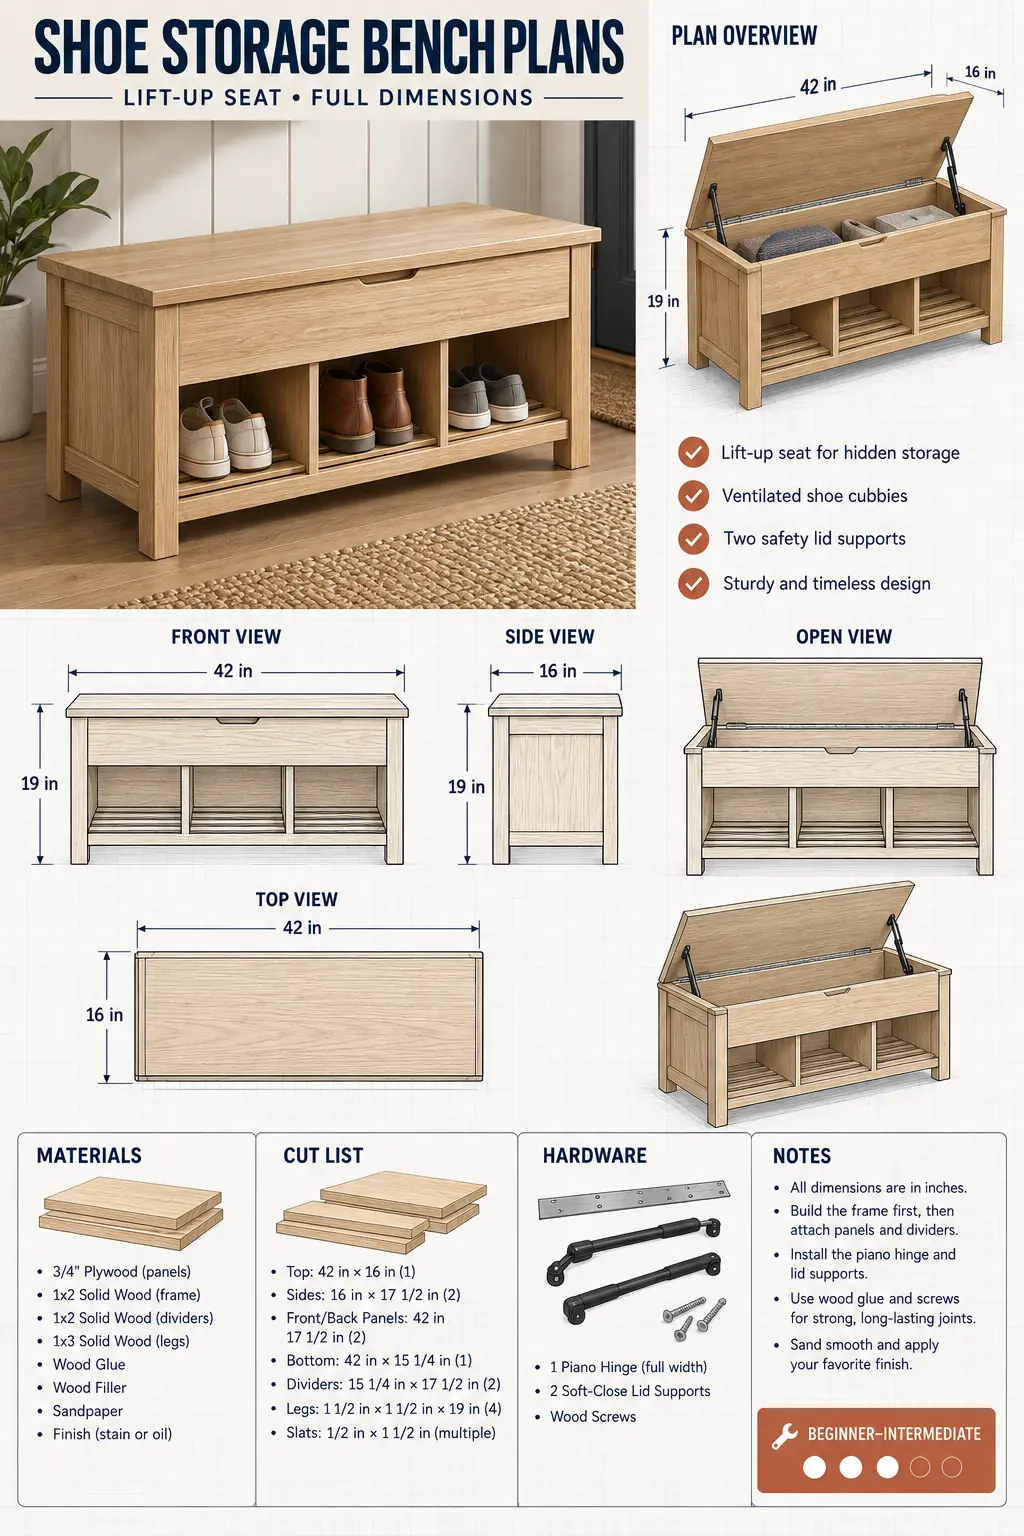
These shoe storage bench plans turn a crowded entryway into one organized landing zone. The finished bench gives you a comfortable place to sit while putting on shoes, three open cubbies for everyday footwear, and a hidden compartment beneath a lift-up seat for accessories, cleaning supplies, or seasonal items. At only 16 inches deep, it fits narrow hallways without feeling oversized.
The project is deliberately straightforward. Its structure is a rigid plywood storage box supported by two framed side assemblies. A full-width lid sits on a continuous piano hinge, while two correctly rated lid supports control the opening motion and prevent the seat from dropping freely. Below the box, a slatted shelf and two dividers create three ventilated shoe cubbies.
This guide uses one locked design from beginning to end. Every dimension in the cut list, drawings, and assembly instructions refers to the same 42-inch-wide bench. Read the entire plan before cutting, and verify the installation template supplied with your particular lid-support hardware.
Project Overview
| Detail | Specification |
|---|---|
| Overall width | 42 in. |
| Overall depth | 16 in. |
| Overall height | 19 in. |
| Hidden compartment | Approximately 38½ in. W × 13¾ in. D × 5½ in. H |
| Shoe cubbies | Three open bays, approximately 12 in. wide each |
| Seat | One lift-up plywood panel with hardwood edging |
| Main material | ¾-in. cabinet-grade plywood and solid wood |
| Primary joinery | Pocket screws, glue, and countersunk screws |
| Lid hardware | 40-in. piano hinge and two soft-close lid supports |
| Recommended finish | Water-based polyurethane or hard-wax oil |
The 19-inch finished height is close to a normal dining-chair seat and feels natural for most adults. The 42-inch width gives one adult generous space or allows two children to sit side by side. The 16-inch depth keeps the bench stable while remaining practical for a compact entryway.
Before You Build
Measure the wall and floor where the bench will sit. Check baseboards, door swing, heating vents, outlets, and the path people use through the room. Leave enough clearance behind the seat for the lid to open without rubbing the wall. If your hinge or lid support needs more rear clearance than shown, move the bench slightly forward rather than reducing the depth of a structural part.
Buy the lid supports before drilling their mounting holes. These fittings are not universal. Their load rating depends on lid weight, lid depth, mounting position, and whether one or two supports are used. Follow the manufacturer’s template and rating table. Do not copy hinge-hole positions from a decorative rendering.
The storage compartment is intended for shoes and light entryway accessories—not for children to climb inside. The U.S. Consumer Product Safety Commission has warned that freely falling chest lids can cause serious injury and recommends lid-support hardware that holds the lid open. Use properly rated supports, confirm that the lid remains controlled throughout its travel, avoid a locking latch, and supervise children around the bench.
Materials and Hardware
Lumber and Sheet Goods
- One sheet of ¾-in. cabinet-grade plywood, 4 × 8 ft.
- Two 1 × 3 × 8-ft. boards for rails, edging, and shelf frame
- Four 1½ × 1½-in. leg blanks, each at least 19 in. long, or stock that can be milled to size
- Five 1 × 2 × 8-ft. boards for ventilated shelf slats
- Optional iron-on veneer edge banding
- Wood glue
- Paintable wood filler or a color-matched filler
- 120-, 180-, and 220-grit abrasives
- Finish of choice
Hardware
- One 40-in. continuous piano hinge
- Two soft-close or counterbalanced lid supports rated for the completed lid
- 1¼-in. coarse-thread pocket screws
- 1¼-in. wood screws
- ¾-in. screws for the piano hinge, or the screws supplied by its manufacturer
- Screws supplied with the lid supports
- Four felt or rubber floor pads
- Optional anti-tip brackets if the bench may be pulled or climbed on
Complete Cut List
Cut plywood parts only after confirming the actual thickness of your sheet. “¾ inch” plywood is often slightly thinner, and that difference affects fitted parts.
| ID | Part | Qty. | Material | Finished size |
|---|---|---|---|---|
| A | Side panels | 2 | ¾-in. plywood | 14½ × 17½ in. |
| B | Storage-box front | 1 | ¾-in. plywood | 40½ × 6 in. |
| C | Storage-box back | 1 | ¾-in. plywood | 40½ × 6 in. |
| D | Storage-box bottom | 1 | ¾-in. plywood | 40½ × 14½ in. |
| E | Lift-up seat | 1 | ¾-in. plywood | 42 × 16 in. |
| F | Lower front rail | 1 | 1 × 3 solid wood | 39 × 2½ in. |
| G | Lower back rail | 1 | 1 × 3 solid wood | 39 × 2½ in. |
| H | Legs | 4 | 1½-in. square solid wood | 18¼ in. long |
| I | Cubbie dividers | 2 | ¾-in. plywood | 13¾ × 7¼ in. |
| J | Shelf slats | 7 | 1 × 2 solid wood | 39 in. long |
| K | Slat support cleats | 2 | 1 × 2 solid wood | 13¾ in. long |
| L | Seat front edging | 1 | ¾ × 1-in. solid wood | 42 in. long |
| M | Seat side edging | 2 | ¾ × 1-in. solid wood | Cut to fit |
The leg assemblies establish the 42-inch overall width: 39 inches between the outside legs plus two 1½-inch legs equals 42 inches. The 42 × 16-inch seat finishes flush with the outer footprint. The storage box fits between the side assemblies, while the lid overlaps it enough to create a clean seat line.
Tools Required
- Table saw, track saw, or circular saw with a straightedge guide
- Miter saw or crosscut guide
- Drill/driver and bits
- Pocket-hole jig
- Countersink bit
- Combination square
- Tape measure and marking knife or sharp pencil
- Four long clamps and several small clamps
- Random-orbit sander
- Brad nailer, optional
- Straight router bit, optional for edge treatment
- Eye protection, hearing protection, and suitable dust collection or respiratory protection
Use every machine with its guards and safety devices working correctly. Keep hands outside the blade path, support large sheet goods, and connect dust collection close to the cutting source. OSHA’s woodworking guidance identifies machine guarding and wood dust as important hazards; your tool manufacturer’s manual remains the controlling instruction for your specific machine.
Cutting and Preparation
Break down the plywood into manageable rectangles before making final cuts. Mark each finished component with its part letter on a face that will eventually be hidden. Cut paired parts—especially the two sides and two dividers—together or from the same fence setting so they match exactly.
Check the seat panel for flatness. A twisted or bowed lid will be frustrating even if the base is perfectly square. Apply hardwood edging to the exposed front and side edges, then trim it flush after the glue cures. Slightly ease every touchable edge with 180-grit abrasive or a small round-over bit.
Before assembly, sand plywood faces to 180 grit. It is easier to achieve a consistent finish on flat panels than inside a completed storage box. Do not round the mating edges that must close tightly.
Step-by-Step Instructions
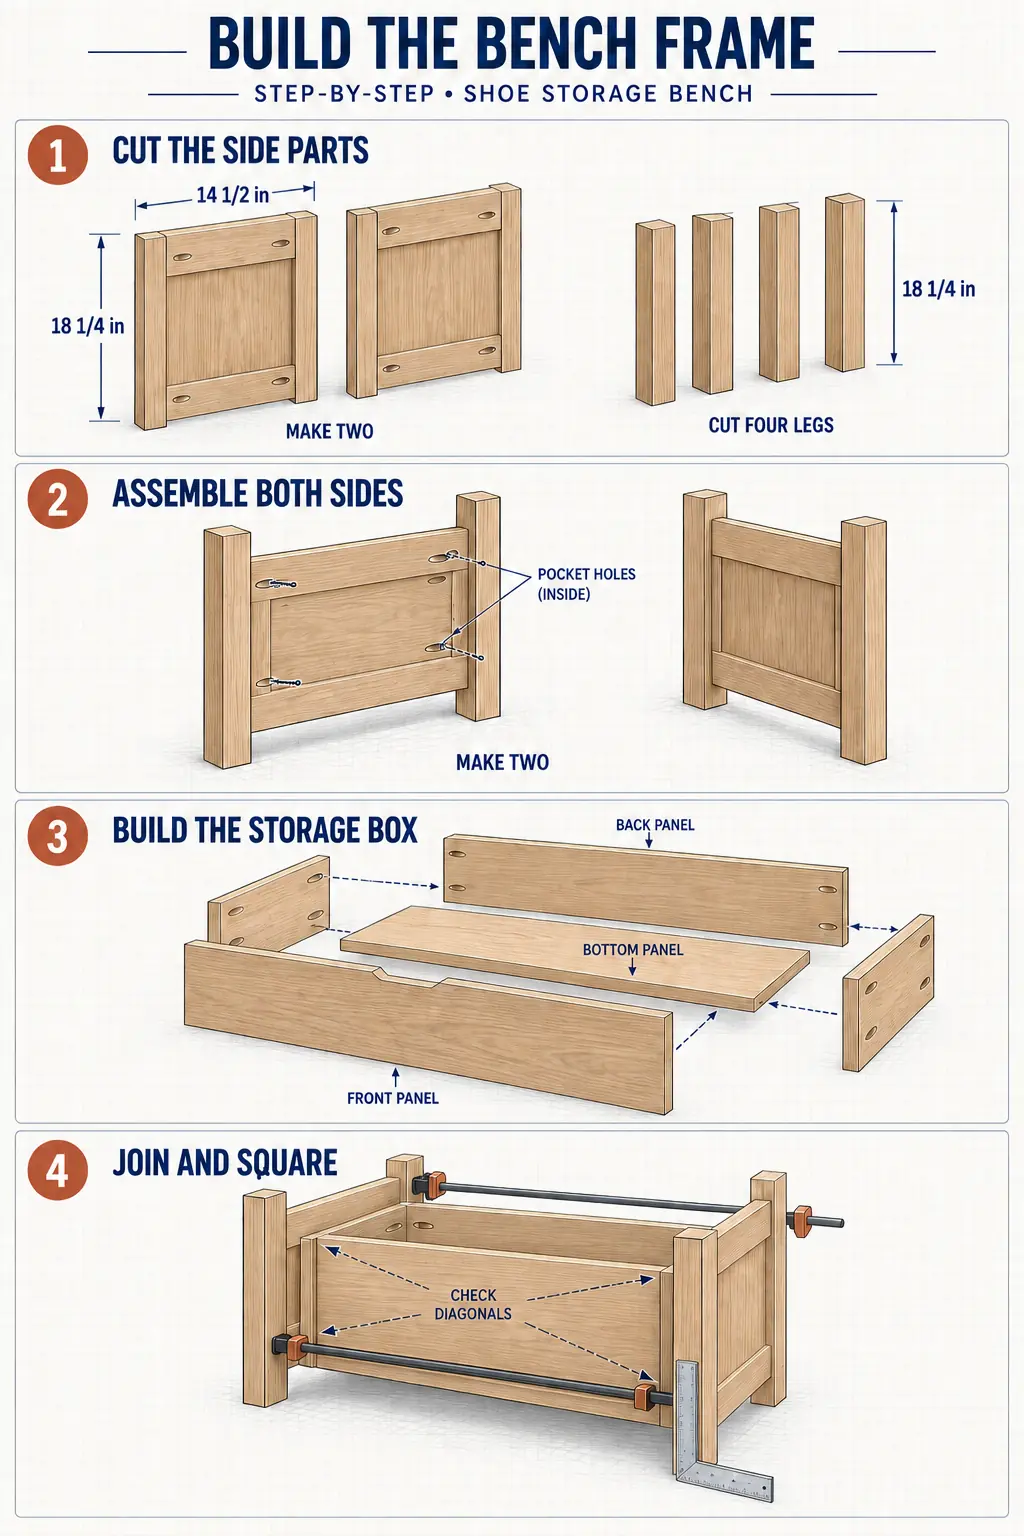
Step 1: Build the Two Side Assemblies
Place two legs on a flat surface with their outside edges 14½ inches apart. Position one side panel between them, flush with the top and set back slightly from the front edges to create a deliberate reveal. Drill pocket holes on the hidden face of the panel, apply glue, and fasten it to the legs.
Repeat for the opposite side. Before the glue sets, stand both assemblies upright and compare them. Their legs, top edges, and lower clearances must match. If one side is even ⅛ inch different, the long rails will force the bench out of square.
Step 2: Assemble the Storage Box
Lay the bottom panel on spacers. Attach the 6-inch front and back panels along its long edges using glue and pocket screws driven from the hidden underside. The outside width should be 42 inches once the side assemblies are added; the box itself remains 40½ inches wide between them.
Dry-fit the box between the side assemblies. Its top edge should sit below the final seat height, leaving room for the ¾-inch seat and hardware movement. Measure both diagonals across the box. Adjust it until those measurements match, then clamp it.
Step 3: Join the Box to the Sides
Apply glue to the side-panel contact areas and slide the storage box into position. Drive screws from inside the box into the side panels and legs, keeping fasteners away from the future hinge and lid-support locations. Recheck the full bench width and both diagonals.
Do not rely on screws to pull a distorted box square. Correct the alignment with clamps first; then add fasteners. A square carcass produces a lid gap that looks even from every angle.
Step 4: Install the Lower Rails
Fit the 39-inch front and back rails between the legs. Their top edges establish the support level for the slatted shoe shelf. Use a spacer block at each corner so both rails are parallel to the floor. Attach them with glue and concealed pocket screws.
Check that the lower frame does not rock. Place the bench on a known-flat surface and correct any twist while the glue is still wet. When the frame is square, the seven shelf slats will fit without tapering gaps.
Step 5: Add the Shelf Cleats and Slats
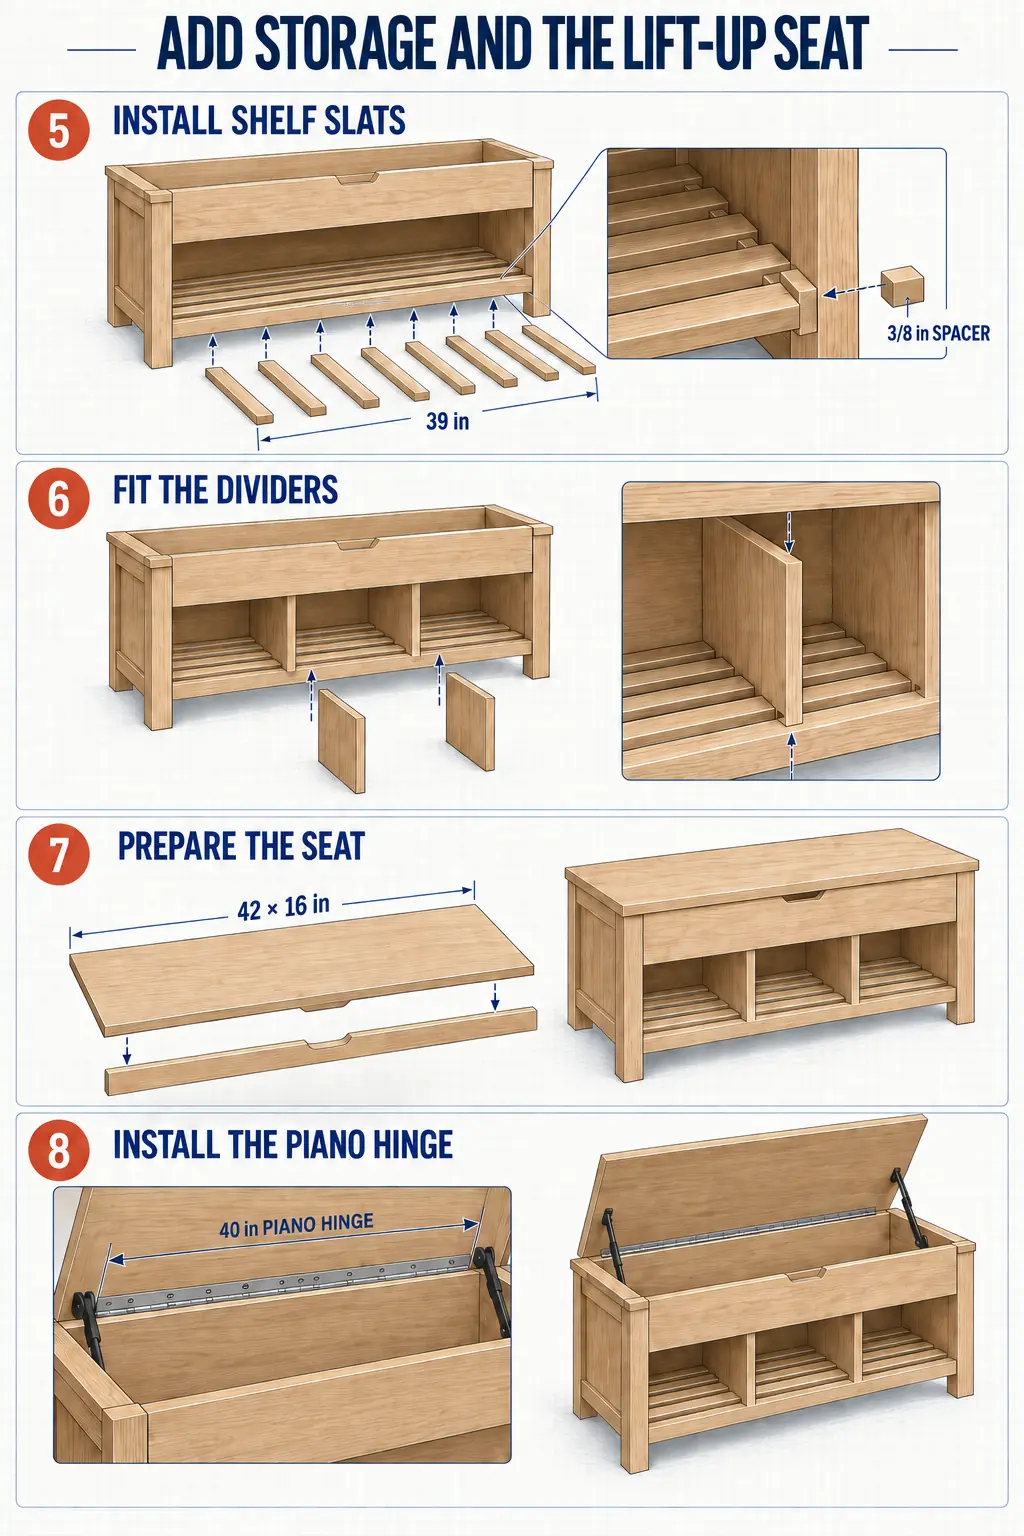
Fasten one 13¾-inch cleat inside each side assembly at the same height as the rails. Cut seven slats to 39 inches, sand them, and arrange them front to back with even ventilation gaps. A pair of ⅜-inch spacer blocks makes installation faster and keeps the rhythm consistent.
Predrill near the ends of each slat to prevent splitting. Use glue plus one screw at every support point. Keep the screw heads slightly below the surface so shoe soles cannot catch on them.
Step 6: Fit the Two Cubbie Dividers
Divide the clear opening into three equal bays. Place the two plywood dividers on the slatted shelf and align their front edges with the storage-box front. Fasten upward through the underside of selected slats and downward from inside the storage-box bottom. Predrill every hole.
The dividers help organize shoes and brace the long span, but they should not be forced into position. Plane or sand their top edges if the fit is too tight. A divider that bows the box will affect the lid alignment.
Step 7: Prepare the Lift-Up Seat
Trim the hardwood edging flush, fill small defects, and sand the seat through 220 grit. Mark its center and dry-position it on the bench. Confirm that the front and side overhangs are even and that the rear edge has the clearance required by your hinge.
Cut a shallow finger pull at the center of the front edge if desired. A 4-inch-wide half-oval is comfortable and avoids the need for a projecting handle in a narrow hallway. Sand the recess carefully.
Step 8: Install the Piano Hinge
Separate the hinge leaves if the hinge design permits. Center the hinge along the rear edge, mark every hole, and drill shallow pilot holes. Fasten one leaf to the seat and the other to the back panel using the correct screws. Do not overtighten; small hinge screws strip easily in plywood.
Open and close the seat slowly. The reveal should remain consistent, and the lid must not scrape the side assemblies or wall. Correct the hinge position now, before installing the lid supports.
Step 9: Install Both Lid Supports
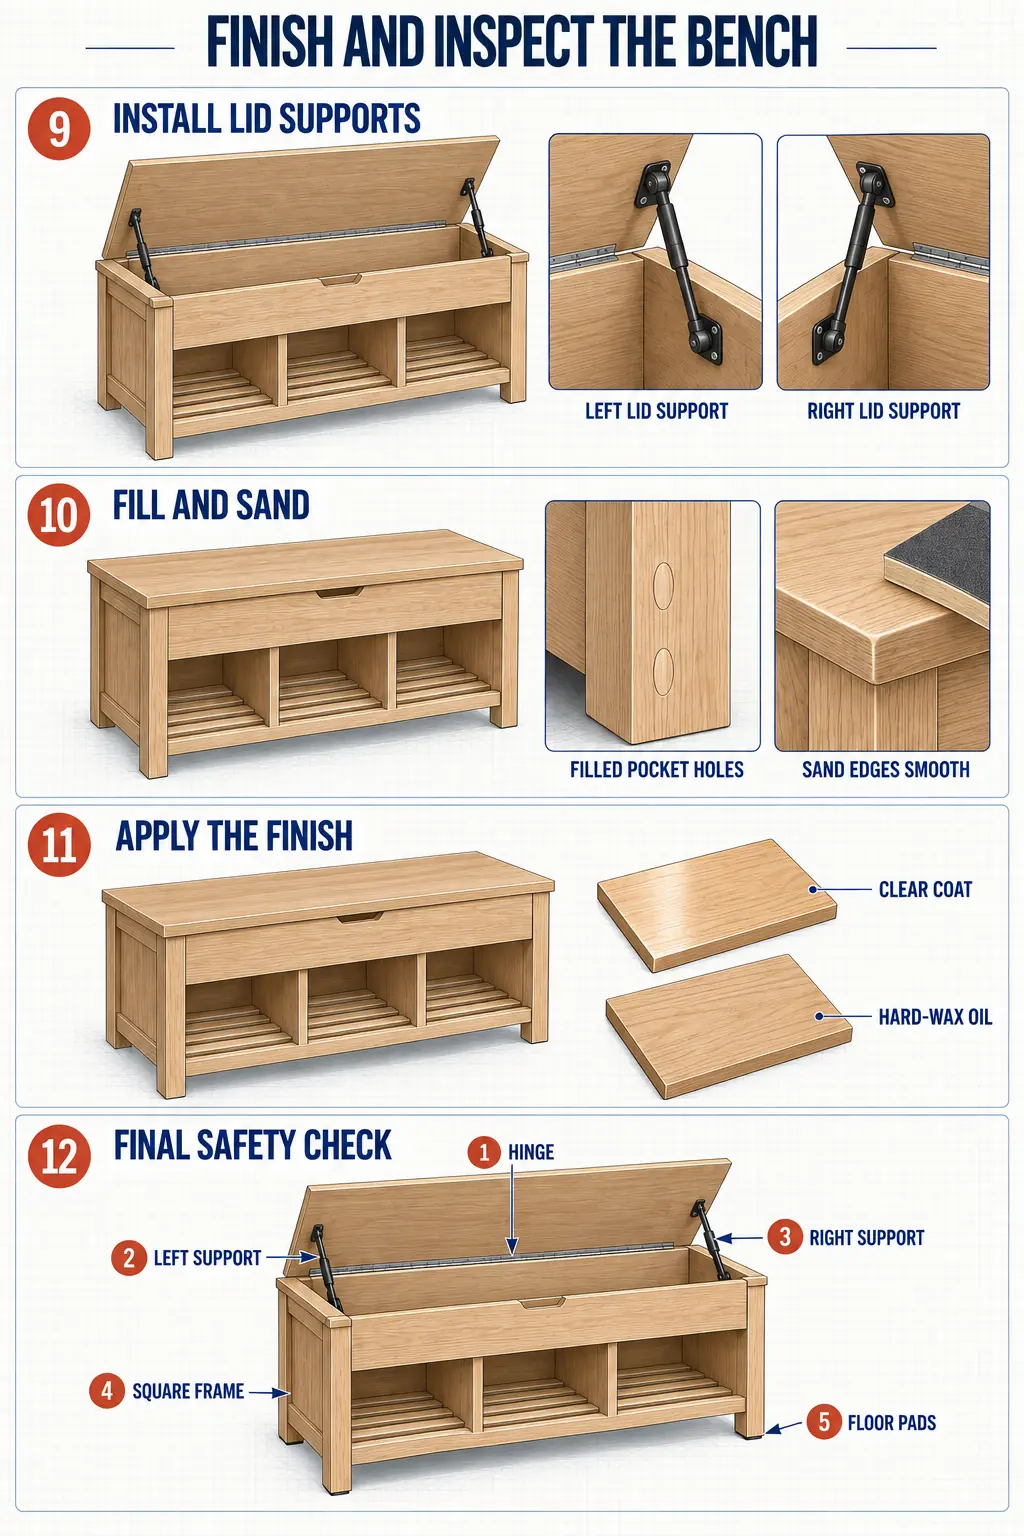
Use the paper template or measurements supplied with your exact support hardware. Mark the body-side and lid-side mounting points on both ends. Predrill, attach the supports, and test the lid while keeping one hand on it. Do not assume a support works properly just because it holds the lid fully open.
Test at several angles. The seat should open smoothly, remain controlled, and avoid slamming from any normal position. If it drops, binds, or twists, stop and correct the hardware selection or position. Never substitute decorative stays for correctly rated supports.
Step 10: Fill, Sand, and Ease the Edges
Fill visible fastener holes and minor plywood voids. After the filler cures, sand the complete bench with 180 grit and finish exposed touch surfaces with 220 grit. Break sharp corners very lightly; the seat should feel comfortable under the hand but retain crisp furniture lines.
Vacuum the project thoroughly, then wipe it with a clean lint-free cloth. Do not blow fine dust around the room immediately before applying finish.
Step 11: Apply the Finish
For a natural light-oak appearance, apply a clear water-based polyurethane or a compatible hard-wax oil. Test the finish on an offcut from the same plywood because veneer color and glue squeeze-out can change the result.
Remove or mask hardware as recommended. Apply thin coats, sand lightly between coats when the product requires it, and respect the manufacturer’s drying and curing times. Ventilate the area and handle solvent-bearing products according to their labels.
Step 12: Reassemble and Perform a Final Inspection
Reinstall the hinge and supports, tighten loose fasteners, and add floor pads. Load the lower shelf gradually and sit on the center of the bench while another adult watches for movement. Then test the lid repeatedly at different angles.
Confirm five points before daily use: the frame does not rack, the seat does not rub, the hinge screws remain tight, both supports control the lid, and no screw tips project into storage areas. Add suitable anti-tip brackets if children may climb on the bench or if the floor and wall location make movement possible.
Finishing Options
Clear Natural Finish
A clear water-based topcoat preserves the light color and works well for modern entryways. Apply extra protection to the seat and lower shelf because they receive the most abrasion and moisture.
Painted Base with Wood Seat
Paint the base muted black, warm white, or deep navy while leaving the seat natural. Prime plywood edges carefully, sand the primer smooth, and apply durable cabinet enamel. Finish the seat separately before final hardware installation.
Full Painted Finish
For a built-in appearance, match the wall or trim color. Use edge banding or filler on every exposed plywood edge; otherwise the laminations remain visible through paint.
Common Mistakes to Avoid
Buying lid supports after drilling. Support geometry varies. Hardware must be selected and tested before mounting-hole locations are finalized.
Using only one light-duty support. A wide plywood seat can twist and fall unevenly. Use a matched pair rated for the lid’s weight and depth.
Ignoring the open-lid wall clearance. The bench may look perfect until the lid strikes the wall. Test the full opening arc at the intended location.
Cutting all parts from nominal thickness. Measure the real plywood thickness and dry-fit assemblies before committing to fitted dimensions.
Forcing the box square with screws. Clamp the structure until both diagonal measurements match, then install fasteners.
Leaving sharp edges. Entryway furniture is touched constantly. Ease exposed corners without rounding mating surfaces.
Finishing around installed hardware. Finish buildup can interfere with moving parts. Remove or mask the hinge and supports according to their instructions.
Treating the bench as a toy chest. Do not add a locking latch or market the compartment as a place for children. Use controlled lid hardware and maintain ventilation gaps.
Adjusting the Plans
To build a 36-inch version, reduce the seat, box front, box back, bottom, rails, and shelf slats by 6 inches. Keep the side depth and height unchanged. Recalculate the three cubbies or use two wider bays.
For a 48-inch version, do not simply lengthen every horizontal component. Add a center structural leg or a stronger subframe beneath the seat and shelf. A longer lid is heavier and changes the required support rating.
If you want a cushion, keep the wooden seat as the structural lid and attach a removable thin pad with non-slip backing. Avoid thick upholstery along the rear edge, where it can interfere with the hinge and opening clearance.
Maintenance
Every three months during the first year, inspect the hinge screws and lid-support mounts. Tighten loose fasteners before they enlarge their holes. Wipe wet footwear and road salt from the shelf promptly. Renew the protective finish when water stops beading on the seat or high-wear edges look dry.
If the lid begins dropping faster than it did when new, stop using the storage compartment until the supports are inspected or replaced. Hardware is a wear component, not a permanent guarantee.
Frequently Asked Questions
How deep should a shoe storage bench be?
Sixteen inches is a practical compromise for most entryways. It provides a comfortable seat and enough space for angled or straight shoe storage without projecting as far as a full cabinet.
Is 19 inches too high for a bench?
No. A 19-inch finished height is comparable to many dining chairs. If you plan to add a thick cushion, reduce the wooden base height so the final seating surface remains comfortable.
Can I use MDF instead of plywood?
Plywood is the better choice for this design because it holds screws more reliably and tolerates entryway moisture better. MDF can produce a smooth painted surface but is heavier and requires different fastening details.
What hinge should I use for a lift-up seat?
A full-width piano hinge distributes load across the back edge and helps keep a wide lid aligned. It does not replace lid supports; the hinge guides the motion, while correctly rated supports control the weight.
How do I keep the lid from slamming?
Install a matched pair of soft-close or counterbalanced lid supports selected for the lid’s actual weight and depth. Use the manufacturer’s mounting template and test the lid at multiple angles.
How many pairs of shoes fit?
The three lower cubbies usually hold three to six pairs depending on shoe size and arrangement. The upper compartment can hold additional light footwear or accessories, but avoid overfilling near the moving hardware.
Can the bench be made without pocket holes?
Yes. Dados, dowels, loose tenons, or carefully planned countersunk screws can replace pocket screws. Preserve the same final dimensions and verify that the alternate joints provide equivalent resistance to racking.
Should the bench be attached to the wall?
Anti-tip attachment is recommended when children are present, when the bench sits on an uneven floor, or when users may pull on the open lid. Choose fasteners suitable for the wall structure—not only the surface finish.
Final Build Checklist
- Overall size is 42 × 16 × 19 inches.
- Both side assemblies match.
- Diagonal carcass measurements are equal.
- Shelf slats have even ventilation gaps.
- Cubbie dividers are square.
- Seat overhang and rear clearance are even.
- Piano hinge screws are secure.
- Two rated lid supports control the seat at multiple angles.
- Finish is fully cured before loading.
- Floor pads and any required anti-tip hardware are installed.
These shoe storage bench plans create a compact piece of furniture that earns its footprint three times: seating, visible everyday shoe organization, and hidden storage. The build is approachable because the geometry is simple, but its quality depends on careful squaring, consistent reveals, and correctly selected lid hardware. Take time during dry fitting, keep every image and measurement tied to the locked design, and the finished bench will look intentional rather than improvised.