How to Read Woodworking Plans
Learning how to read woodworking plans prevents expensive cutting errors and makes the build sequence easier to understand. This guide explains the drawings, dimensions and notes step by step.
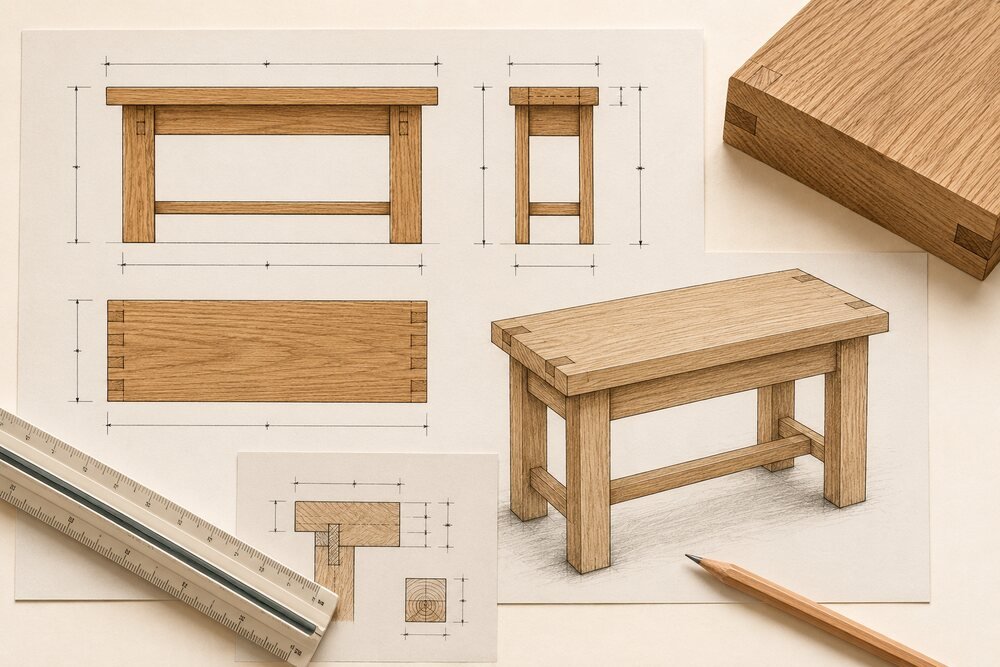
How to read woodworking plans before cutting
Understanding how to read woodworking plans starts with identifying the finished size, drawing scale, views and any notes that override a general dimension.
Start with the real project in front of you. Record its dimensions, material thickness and intended use. Read the complete guide before making a decision, then test the most important operation on an offcut.
Three checks that prevent rework
- Confirm actual material thickness and the finished outside dimensions.
- Mark related parts from the same reference face and edge.
- Test moving hardware and critical joints on scrap before final assembly.
How to read woodworking plans by view and dimension
A clear method for how to read woodworking plans is to connect every front, side and top view to the same physical edge of the project.
Start with the finished dimensions
Begin with overall width, depth and height. These measurements tell you whether the project fits the room and help you detect a drawing printed at the wrong scale.
Work from one reliable reference face and compare the part with the drawing before moving on. Check mating pieces together rather than trusting repeated measurements. A short dry fit here is faster than correcting accumulated errors after assembly.
Understand front, side and top views
Front, side and top views describe the same object from different directions. Trace one distinctive part across all views before interpreting smaller dimensions.
Work from one reliable reference face and compare the part with the drawing before moving on. Check mating pieces together rather than trusting repeated measurements. A short dry fit here is faster than correcting accumulated errors after assembly.
Read the cut list without mixing parts
Give every cut-list row a matching label on the drawing. Mark pieces as they are cut and keep finished dimensions separate from rough stock dimensions.
Work from one reliable reference face and compare the part with the drawing before moving on. Check mating pieces together rather than trusting repeated measurements. A short dry fit here is faster than correcting accumulated errors after assembly.
Recognize common symbols and line types
Solid lines show visible edges, dashed lines usually show hidden features and center lines locate symmetrical parts. Always follow the legend when a plan supplies one.
Work from one reliable reference face and compare the part with the drawing before moving on. Check mating pieces together rather than trusting repeated measurements. A short dry fit here is faster than correcting accumulated errors after assembly.
Turn the drawing into a safe build sequence
Convert the drawing into an ordered checklist: mill stock, cut parts, dry-fit subassemblies, drill joinery, glue, install hardware and finish.
Work from one reliable reference face and compare the part with the drawing before moving on. Check mating pieces together rather than trusting repeated measurements. A short dry fit here is faster than correcting accumulated errors after assembly.
People learning how to read woodworking plans often confuse nominal lumber sizes, add dimensions twice or miss a note that applies to several parts.
Common mistakes to avoid
- Starting before checking the available space, finished dimensions and material thickness.
- Measuring connected parts from different reference edges.
- Skipping a complete dry fit before glue or final hardware installation.
- Forcing an assembly into square instead of finding the inaccurate part.
- Ignoring the instructions supplied with tools and hardware.
Final quality check
Inspect the work from every side on a flat surface. Confirm that moving parts travel freely, fasteners are secure, exposed edges feel smooth and the finish is fully cured. Recheck critical fixings after the first period of normal use.
Safety
Wear suitable eye and hearing protection, support every workpiece securely and disconnect power before changing blades or bits. Use dust collection or a suitable respirator where required. Ask a qualified person to check wall-mounted or load-bearing work whenever the substrate, fixing method or expected load is uncertain.
Once you understand how to read woodworking plans, mark a reference face, highlight critical dimensions and verify the cut list against the drawings before starting.
For general machine and workshop hazards, consult the OSHA woodworking safety guide.
Frequently asked questions
Can the dimensions be changed?
Yes, but update every connected part together. Recheck hardware clearances, symmetry, material spans and the order of assembly before cutting.
Is this suitable for a beginner?
A careful beginner can use this guide by practicing critical cuts on scrap and dry-fitting each stage. Ask an experienced woodworker to review structural, moving or wall-mounted connections.