DIY Wall-Mounted Shoe Rack for a Small Entryway
SMALL SPACES & STORAGE
DIY Wall-Mounted Shoe Rack for a Small Entryway
Shoes have a way of taking over a small entryway because the floor is often the only available storage space. This wall mounted shoe rack DIY project solves that problem by moving everyday footwear onto the wall while keeping the rack shallow enough for a narrow hall or apartment entrance.
By Practical Wood Plans · Verify every dimension and wall fastener before building.
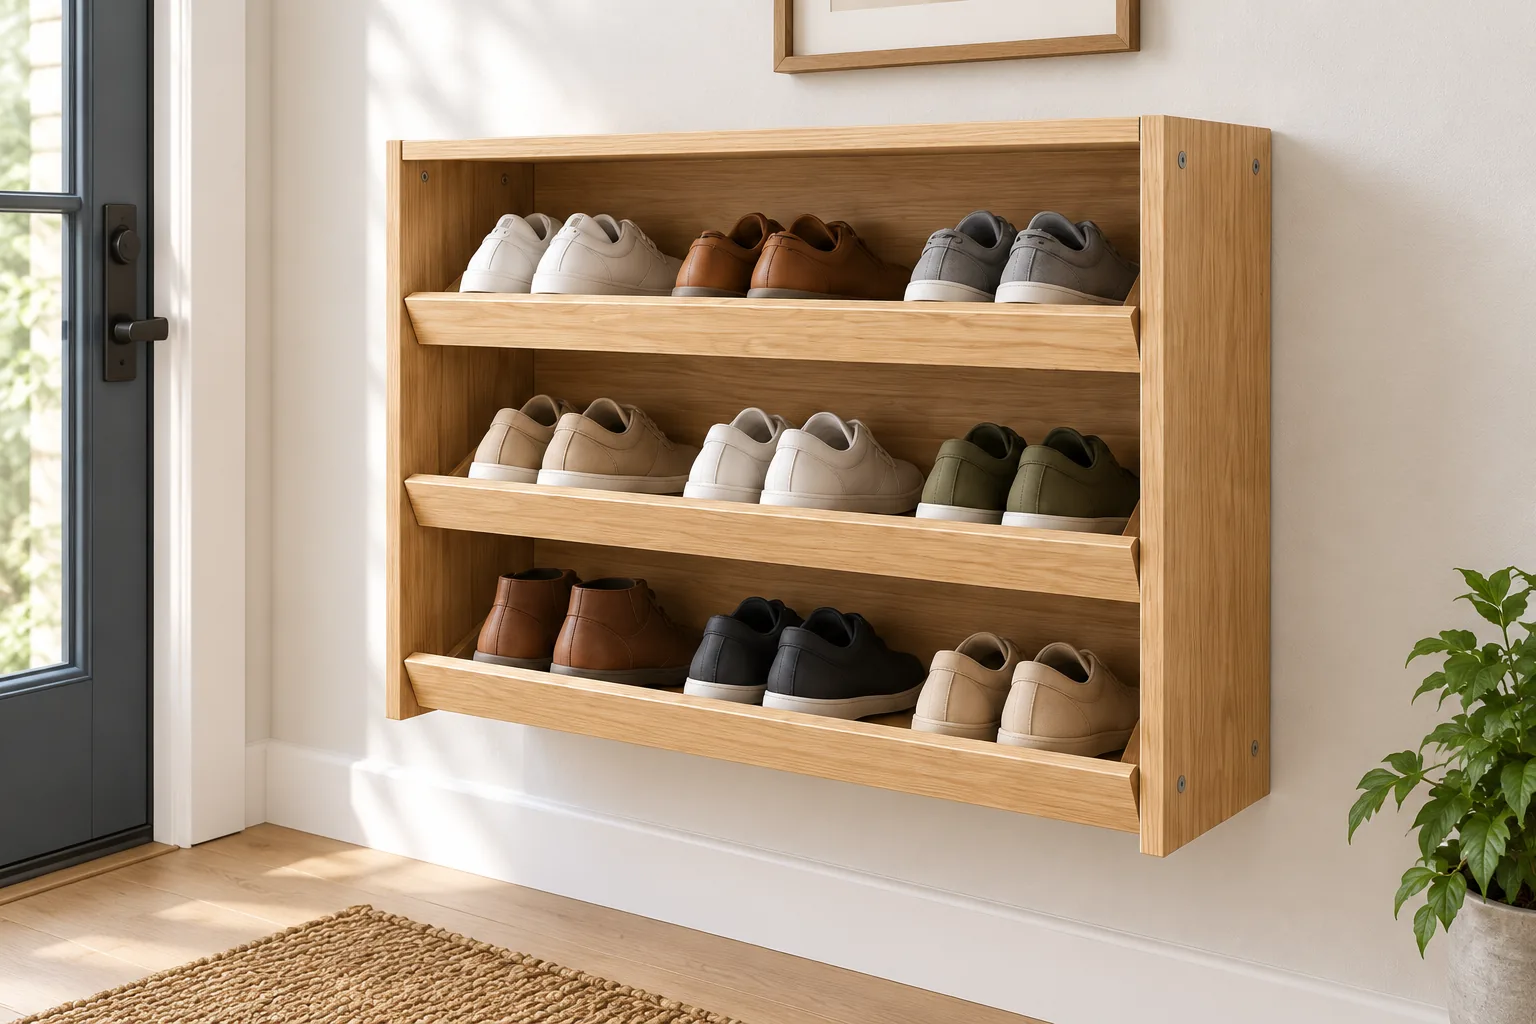
The finished rack measures 36 inches wide, 24 inches high, and 9 inches deep. It has three tilted shoe shelves, each with a front retaining lip, and holds approximately six to nine pairs depending on shoe size. A French cleat carries the load across the wall studs, while two lower safety screws keep the cabinet from shifting or lifting away from the wall.
This plan is designed for a confident beginner or intermediate DIYer. The cuts are straight, the parts repeat, and the assembly is easy to understand. The part that deserves the most attention is the wall installation. A shoe rack may look light when empty, but shoes and the cabinet weight add up. Mount the cleat to structural framing rather than relying on drywall alone.
Wall Mounted Shoe Rack DIY Plan at a Glance
| Detail | Specification |
|---|---|
| Overall width | 36 in |
| Overall height | 24 in |
| Overall depth | 9 in |
| Shoe tiers | 3 tilted shelves |
| Approximate capacity | 6–9 pairs |
| Shelf angle | About 15 degrees |
| Main material | 3/4-in plywood or furniture board |
| Mounting method | French cleat into wall studs |
| Skill level | Confident beginner to intermediate |
| Estimated build time | One weekend, excluding finish cure time |
The 9-inch depth is the key space-saving feature. It keeps the cabinet from projecting too far into the walking path. The shelves tilt back toward the wall, and the front rails prevent shoes from sliding forward. A top panel closes the cabinet visually and helps tie the sides together, but it is not counted as a fourth shoe shelf.
Before buying material, measure the largest shoes you intend to store. Nine inches works well for many everyday shoes because the toe can project slightly while the heel rests against the shelf. Large boots and very long shoes may require a 10- or 11-inch cabinet depth. If you change the depth, change both side panels, all three shelves, and the top panel together.
Materials and Hardware
Lumber and sheet goods
- One partial sheet of 3/4-inch cabinet-grade plywood, approximately 48 × 48 inches or larger
- One 1×2 board long enough to make three 34 1/2-inch retaining lips
- One 3/4-inch-thick cleat blank, 34 1/2 × 4 inches
- Small offcuts for two lower wall spacers
- Optional iron-on edge banding for exposed plywood edges
Fasteners and supplies
- 1 1/4-inch wood screws for cabinet assembly
- Structural wood screws suitable for the wall framing and cleat thickness
- Two lower safety screws with washers
- Wood glue
- Wood filler that matches the chosen finish
- 120-, 150-, and 180-grit sandpaper
- Primer and paint, or a clear oil/water-based protective finish
Do not substitute ordinary drywall screws for structural mounting screws. Drywall screws are brittle and are not intended to support a loaded wall cabinet. Select fasteners rated for the wall material and long enough to pass through the cleat and wall finish and embed securely into the framing.
Tools Required
- Circular saw with a straightedge guide or a table saw
- Miter saw or crosscut guide
- Drill/driver
- Countersink bit
- Stud finder
- 24-inch or longer level
- Tape measure
- Combination square or speed square
- Clamps
- Pencil and marking knife
- Random-orbit sander or sanding block
- Hearing and eye protection
Review the OSHA woodworking safety guidance and follow the instructions supplied with every tool before cutting.
A track saw is convenient but not required. The most important requirement is a reliable straightedge that will keep the long shelf cuts parallel. If the shelf pieces differ in length, the cabinet can rack or the sides can bow during assembly.
Complete Cut List
The dimensions below produce a finished cabinet that is 36 inches wide when using 3/4-inch side panels.
| Part | Quantity | Finished size | Material |
|---|---|---|---|
| Side panels | 2 | 24 × 9 in | 3/4-in plywood |
| Tilted shoe shelves | 3 | 34 1/2 × 9 in | 3/4-in plywood |
| Top panel | 1 | 34 1/2 × 9 in | 3/4-in plywood |
| Front retaining lips | 3 | 34 1/2 × 1 1/2 in | 1×2 lumber |
| French-cleat blank | 1 | 34 1/2 × 4 in | 3/4-in plywood |
| Lower spacers | 2 | 3 × 1 1/2 in | 3/4-in offcuts |
Rip the 4-inch cleat blank lengthwise at 45 degrees to create two mating halves. One half attaches to the wall and the other to the rear of the rack. Mark the mating faces immediately after the rip so they are not accidentally reversed later.
The cut list assumes actual 3/4-inch stock. Measure the material rather than trusting the label. Some plywood is slightly thinner. If your two side panels measure less than 3/4 inch, calculate the interior parts with this formula:
Shelf length = desired overall width − twice the actual side thickness
For example, two true 3/4-inch sides subtract 1 1/2 inches from a 36-inch overall width, leaving 34 1/2 inches for each shelf and the top.
Step 1: Cut and Match the Side Panels
Cut one 24 × 9-inch side panel first. Check both dimensions and confirm that its corners are square. Use that first panel as the template for the second instead of measuring twice. Clamp the two blanks together with their reference edges aligned, then trim them as a pair if necessary.
Matching the side panels is more important than making each number perfect to a fraction of a hair. If one side is slightly taller or deeper than the other, the difference will show at the top panel and the rack may not sit flat against the wall.
Choose one long edge on each side as the back edge. Mark it clearly. Lay the two panels with their inside faces upward and orient them as mirror images. Mark the three shelf locations using the same baseline, not three separate measurements from different edges.
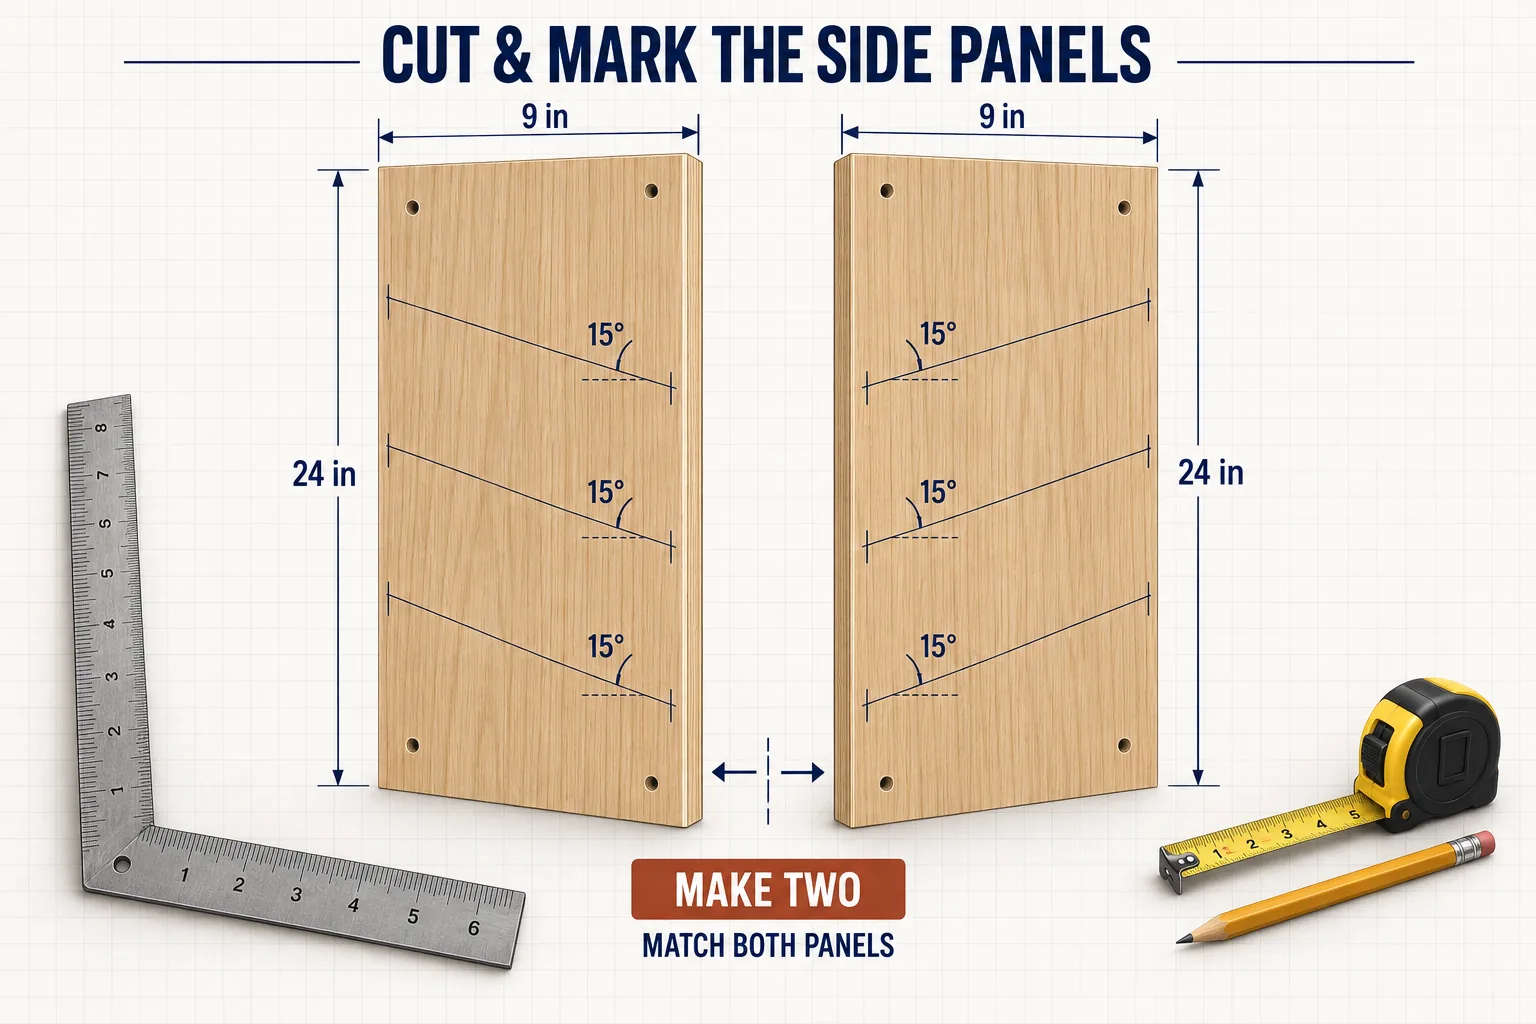
Use a bevel gauge or angle guide to draw three parallel layout lines at approximately 15 degrees. The exact angle can be adjusted slightly, but it must remain identical for all three shelves and on both side panels. Transfer each mark across the paired panels with a square so the shelf ends will meet at the same height.
Before drilling, stand the side panels upright in their final orientation. The shelf lines should tilt down toward the front retaining lips and back toward the wall. This quick dry check prevents building one side backward.
Step 2: Cut the Shelves and Top Panel
Rip a strip of plywood 9 inches wide, then crosscut four pieces at 34 1/2 inches. Three pieces become tilted shelves; the fourth becomes the horizontal top panel. Cutting them from one accurately ripped strip keeps their depths consistent.
Label the shelf pieces S1, S2, and S3 and mark a front edge on each. Check the width by placing one shelf between the side panels without glue. The part should fit cleanly without forcing the sides apart. A tiny amount of clearance is acceptable, but a large gap will weaken the screw connection and make squaring difficult.
If the plywood has one better face, orient it upward on all three shelves. Keep the grain direction consistent. This detail does not change strength, but it makes the finished rack look intentionally built rather than assembled from random offcuts.
Step 3: Add the Front Retaining Lips
Cut three 1×2 retaining lips to the exact shelf length. Sand the top front edge before assembly because it will be harder to reach after the rails are attached. A small round-over made with sandpaper or a router removes the sharp edge that shoes and hands will contact.
Apply a thin continuous bead of glue to the front edge of the first shelf. Position the 1×2 with its ends flush to the shelf ends. Clamp it securely, drill pilot holes, and drive 1 1/4-inch screws. Keep the screw heads slightly below the surface without crushing the wood fibers.
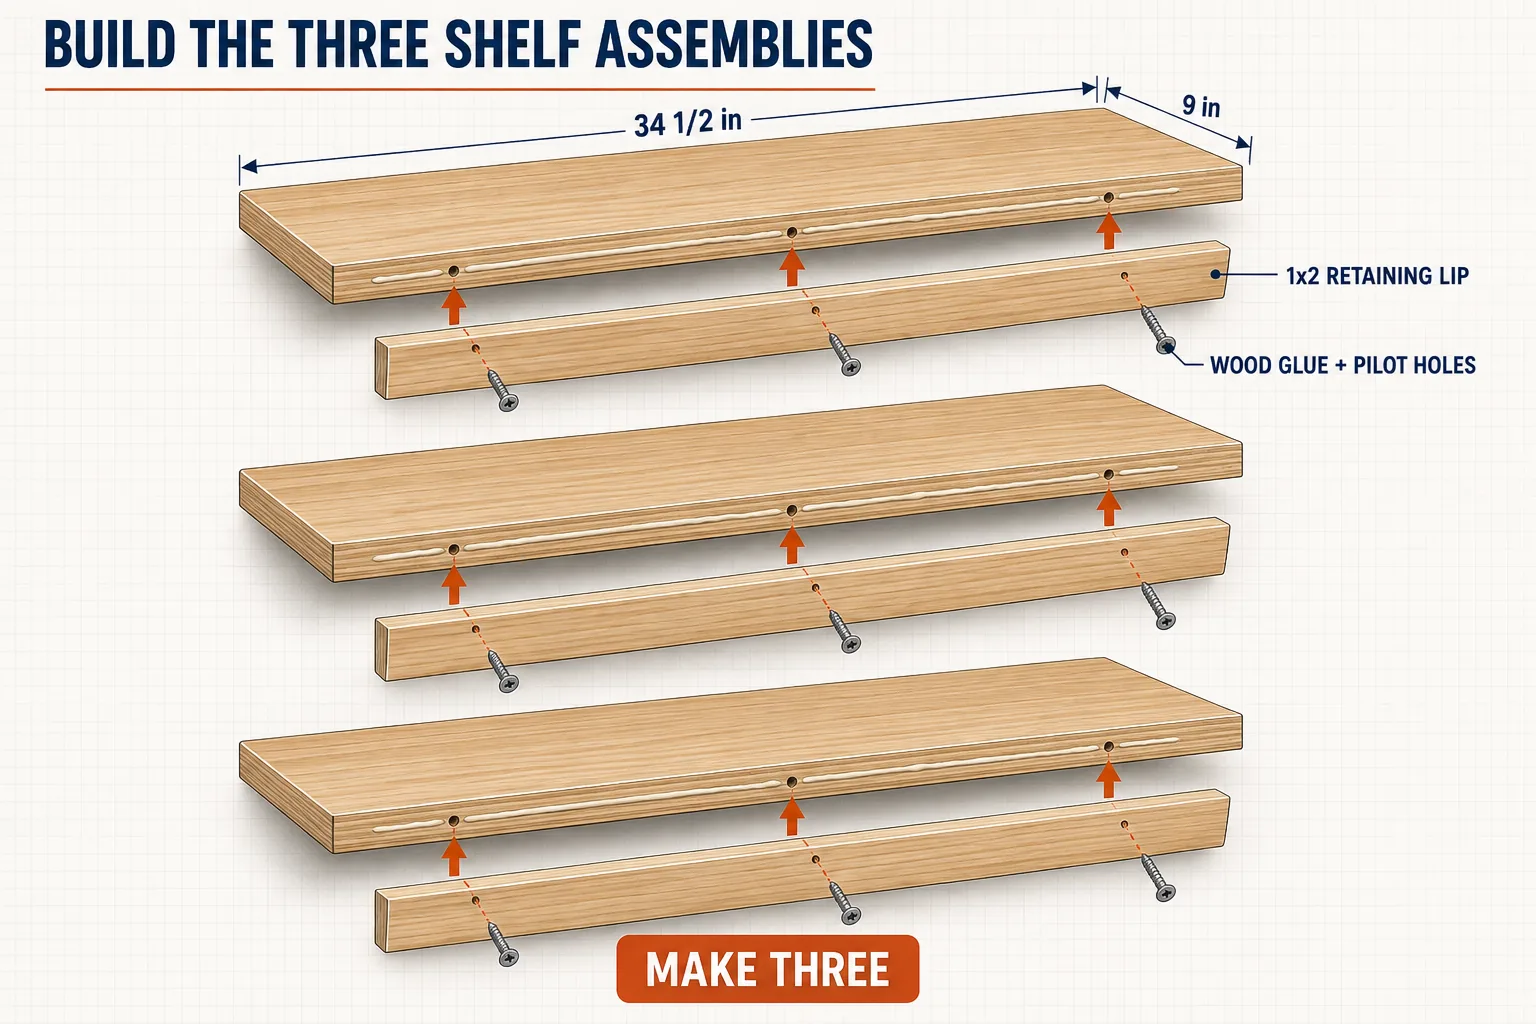
Repeat the same operation for the remaining two shelves. Stack the finished assemblies and compare them from both ends. The lips should align and the shelves should sit flat against one another. Correct a shifted rail now; even a small difference becomes obvious when the three shelves are installed in parallel.
The retaining lip is not decorative. It works with the shelf angle to stop footwear from sliding into the entryway. Do not reduce it to a thin strip without testing the shoes you plan to store.
Step 4: Drill the Assembly Pilot Holes
Place the side panels together with their outside faces visible and reference edges aligned. Mark screw positions along each transferred shelf line. Use at least two well-spaced screws at each shelf end while keeping holes safely away from the plywood edges.
Drill pilot holes through the sides and countersink them lightly. The countersink should allow the screw head to finish just below the surface. A deep countersink removes too much material and weakens the connection.
Also mark the top-panel holes near the upper edges. Keep the hole pattern consistent from side to side. A neat, repeated fastener pattern looks better if you use a clear finish and makes filling easier if you plan to paint.
Step 5: Attach the Shelves to the First Side
Lay the left side panel inside-face upward on a protected work surface. Position the lowest shelf on its 15-degree layout line with the front lip facing the open front. Apply glue to the shelf end, align the shelf with the line, and clamp it temporarily.
Drive the first screw loosely, recheck the angle, then drive the second screw. Tighten both only after the shelf end is fully seated. Repeat with the middle and top shelves. Use spacer blocks between shelves if you want a repeatable gap without measuring at every stage.
Wipe away glue squeeze-out with a damp cloth before it dries. Dried glue can prevent stain or clear finish from penetrating evenly.
Step 6: Add the Second Side and Square the Cabinet
Apply glue to the three exposed shelf ends. Bring the second side panel into position and align every shelf with its marked line. Start one screw in each shelf before fully tightening any of them. This allows small adjustments while all three shelf ends are being seated.
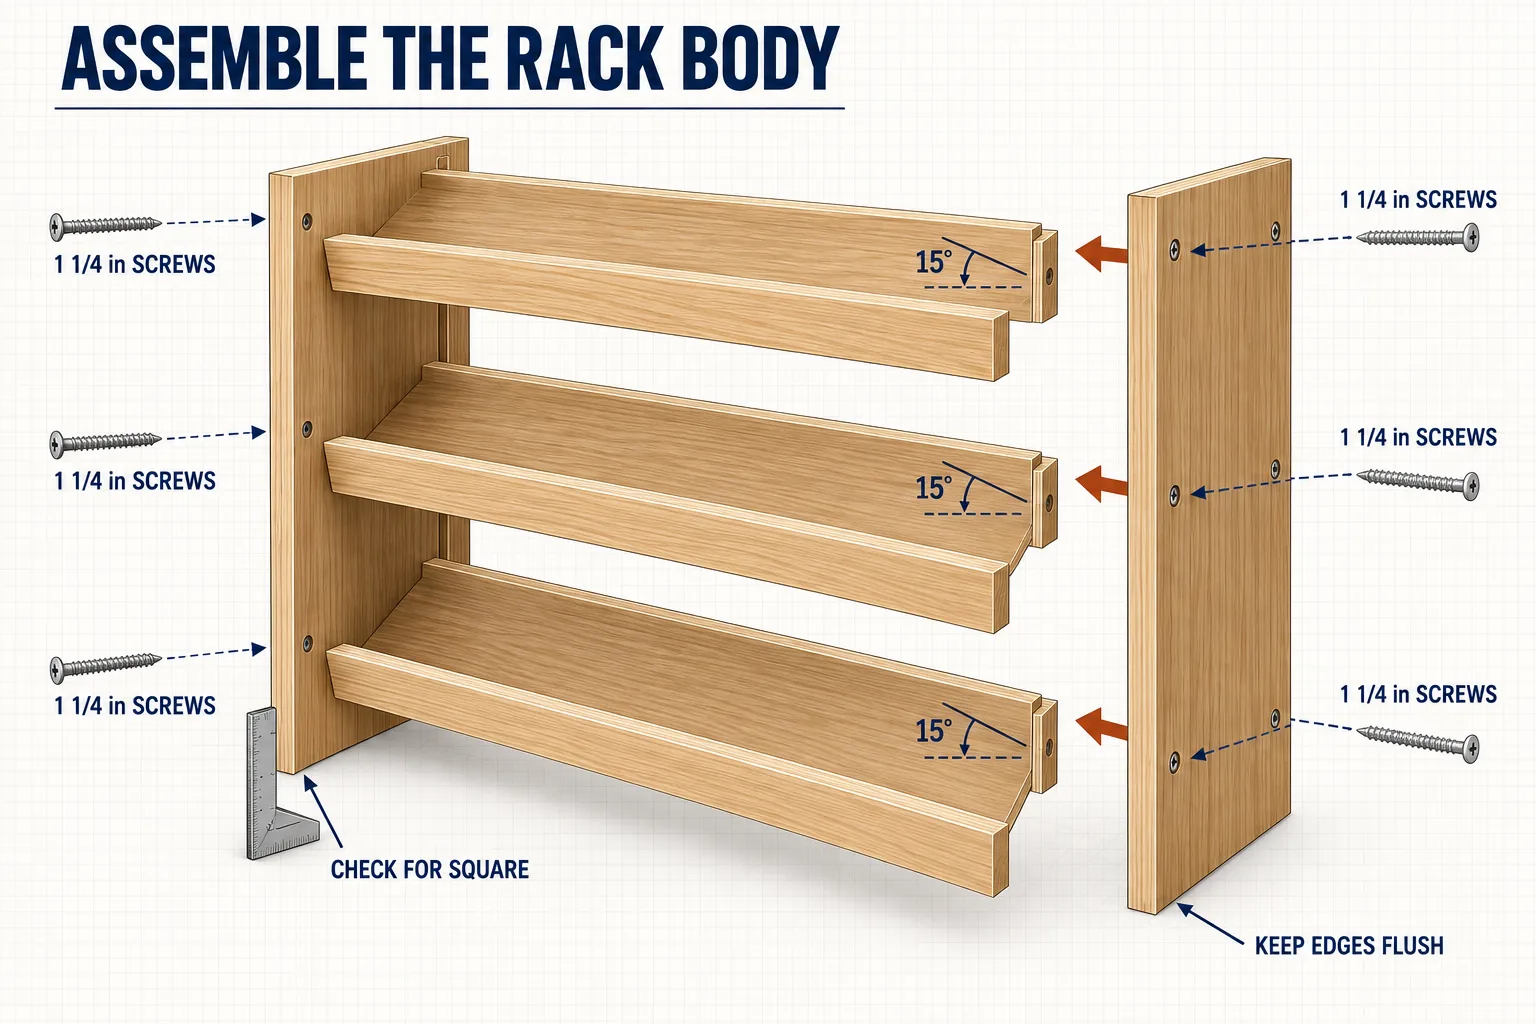
Measure diagonally from the upper-left corner to the lower-right corner, then from upper right to lower left. The measurements should match. If they do not, push the longer diagonal inward until the cabinet is square. A large carpenter square at the lower corners provides a useful secondary check.
Install the top panel between the sides with its upper surface flush to the side-panel tops. The top panel increases rigidity and creates a finished upper edge. Clamp the cabinet and allow the glue to set according to the manufacturer’s instructions before handling it aggressively.
Step 7: Add the French Cleat to the Wall Mounted Shoe Rack DIY Project
Rip the 34 1/2 × 4-inch blank lengthwise with the saw set to 45 degrees. The bevels must mate so the rack-side half hooks down over the wall-side half. Sand only enough to remove splinters; do not round over the mating bevels.
Attach one cleat half across the upper rear of the rack. The bevel opening should face down and toward the back. Fasten it securely into both side panels and, where the design permits, into the underside or rear edge of the top panel. Predrill every screw hole to avoid splitting the narrow cleat edge.
Hold the wall half against the rack half before wall installation. The two pieces should seat completely without rocking. If they bind, locate the high spot and correct it with a sanding block while maintaining the bevel angle.
Step 8: Locate the Wall Studs
Use a stud finder to identify the framing, then verify each location using an appropriate method for your wall. Mark both edges of each stud and draw a centerline. Check the area for plumbing and electrical hazards before drilling.
The wall cleat should cross at least two studs whenever the framing and rack position allow. If your wall construction differs from conventional wood framing, choose an attachment system rated for the actual substrate and anticipated load. When uncertain, consult a qualified professional rather than guessing.
Determine the rack height based on your entryway and users. Leave enough floor clearance for cleaning but avoid placing the top so high that the upper shelf becomes inconvenient. Mark the cleat height, then draw a truly level line.
Step 9: Secure the Wall Cleat
Clamp or hold the wall-cleat half on the level line with its bevel facing upward and away from the wall. Drill pilot holes through the cleat at the verified stud centers. Drive structural screws with washers if recommended by the fastener manufacturer.
Check level after the first screw and again before fully tightening the remaining screws. A small error at the cleat will make the entire rack look crooked, even if the cabinet itself is perfectly square.
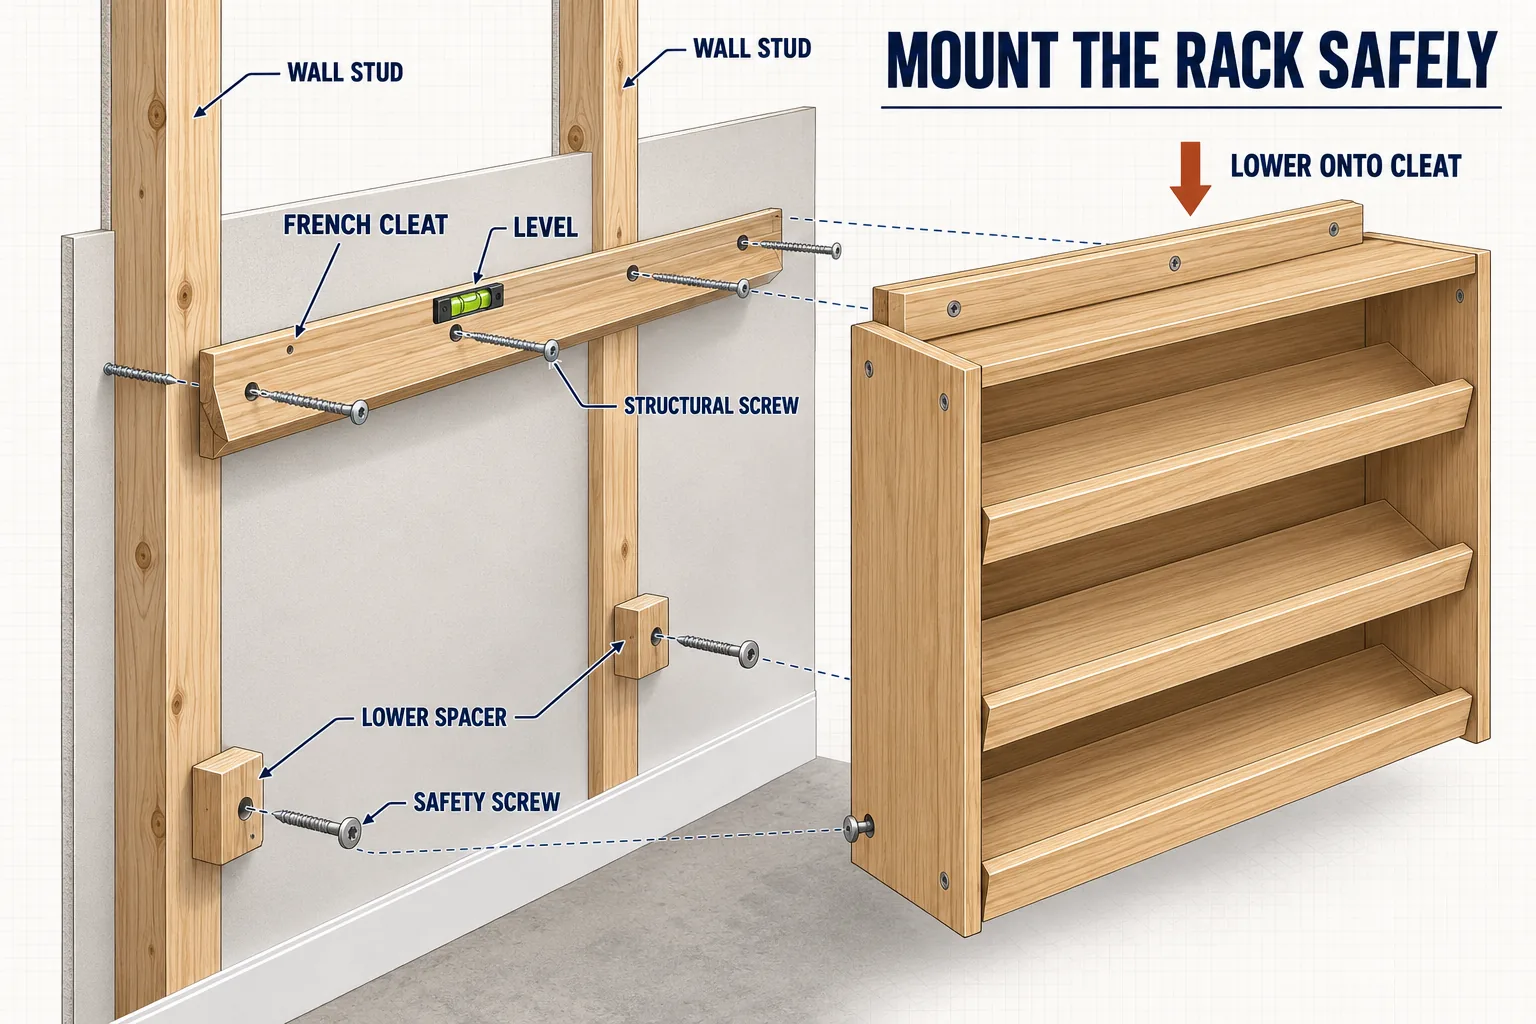
Install two lower spacers at the same thickness as the wall cleat. They keep the cabinet vertical instead of allowing the lower edge to lean toward the wall. Position them near the lower side corners where they can support the cabinet and accept the safety screws.
Step 10: Hang and Secure the Rack
Ask another person to help lift the cabinet. Raise it slightly above the wall cleat, move it toward the wall, and lower it slowly until the two bevels engage. Do not release the cabinet until you have confirmed that the cleat is seated along its full length.
Place the level on the top panel. If the rack is not level, lift it off and correct the wall cleat; do not force the cabinet sideways while it is loaded on the bevel.
Drive the two lower safety screws through the lower rack area or approved mounting points and into the lower spacers/framing. These screws reduce side movement and prevent the rack from being lifted accidentally. They are secondary restraints, not a substitute for a properly secured upper cleat.
Apply downward pressure gradually and inspect all mounting points before adding shoes. Load the lowest shelf first, followed by the middle and upper shelves. Recheck the mounting screws after the first few days of use.
Sanding and Finish
Sand the parts before assembly to 150 or 180 grit, then perform a light final sanding after filling screw holes. Break every exposed edge with a few controlled sanding passes. Sharp plywood corners chip easily and are unpleasant in a narrow entryway.
For a natural appearance, use a clear water-based polyurethane or a hard-wax oil compatible with the wood. A painted finish can hide edge banding and filled screw heads, but prime exposed plywood edges first because they absorb paint differently from the faces.
Finish all visible surfaces, including the underside of the shelves and the inside faces of the sides. Allow the finish to cure fully before loading shoes. Dry-to-touch and fully cured are not the same; follow the product label.
Common Building Mistakes
Measuring each side separately
Small layout differences cause twisted shelves. Pair the sides and transfer the marks from one master layout.
Reversing a shelf angle
Dry-assemble the sides upright and check that every shelf slopes in the same direction before drilling.
Skipping pilot holes
Driving screws near plywood edges without pilot holes can split veneers and push shelf ends out of alignment.
Using the wrong wall fasteners
The cabinet and shoes should not be supported by unverified drywall anchors. Connect the cleat to structural framing or use a professionally specified system for the actual wall.
Forgetting lower spacers
Without spacers equal to the cleat thickness, the rack can lean backward and transfer load unpredictably.
Finishing after mounting
Finishing against a wall creates drips, missed surfaces, and unnecessary mess. Complete the finish and allow it to cure before hanging the rack.
How to Customize the Plan
To make a narrower rack, keep the 24-inch height and 9-inch depth but shorten the top, shelves, rails, and cleat by the same amount. Do not make the cleat dramatically shorter than the cabinet; distributing the load across a wide cleat is one of the design’s advantages.
To store larger shoes, increase the depth to 10 or 11 inches and make the side panels, shelves, and top equally deeper. Test a full-size cardboard profile in the entryway before cutting wood. Door swing, baseboards, and the walking path matter as much as storage capacity.
For children’s shoes, the rack can be built narrower and mounted lower. However, a wall-mounted cabinet must never be treated as a climbing structure. Maintain structural attachment and lower safety fasteners regardless of cabinet size.
Frequently Asked Questions
How many shoes will this rack hold?
The three 34 1/2-inch shelves generally hold six to nine pairs. Capacity depends on shoe width and whether pairs are placed flat or slightly staggered.
Can I mount the rack using drywall anchors only?
That is not the recommended approach for this plan. The upper French cleat should be secured to structural framing or to a mounting system properly rated for the wall and total loaded weight.
Why are the shelves tilted?
The tilt reduces the visual depth of the stored shoes and helps create a compact profile. The front retaining lips stop shoes from sliding forward.
Can I use solid wood instead of plywood?
Yes, but account for seasonal wood movement and actual thickness. Straight, stable boards are essential, and the shelf-length calculation may need adjustment.
Is the top panel required?
The top panel is included in this plan because it stiffens the cabinet and completes the form. It is not one of the three shoe tiers.
What if my studs do not align with the cleat position?
Reposition the rack if practical, or use a correctly engineered mounting solution for the wall construction. Do not improvise fasteners without knowing their load rating and substrate requirements.
Can the plan be used for boots?
Low shoes fit best. Ankle boots may fit on the upper tier if there is sufficient clearance. Tall boots require a different shelf arrangement and should not be forced into this compact design.
Final Check Before Use
Confirm that the rack is level, the cleat is fully engaged, every structural screw is tight, and the lower safety screws are installed. Inspect the shelf rails and side connections for movement. Add footwear gradually and stop if the cabinet shifts, creaks, or pulls away from the wall.
This wall mounted shoe rack DIY plan keeps a small entryway organized without sacrificing floor area. Its repeated parts make it approachable, while the French-cleat installation gives the finished project the secure, built-in appearance that a narrow hallway needs.