How to Build a Wall-Mounted Folding Laundry Station
Folding laundry station plans can turn an unused wall into a compact work surface and organized storage. This guide explains how to build a shallow cabinet with a supported fold-down panel.
By Practical Wood Plans · Verify every dimension before building.
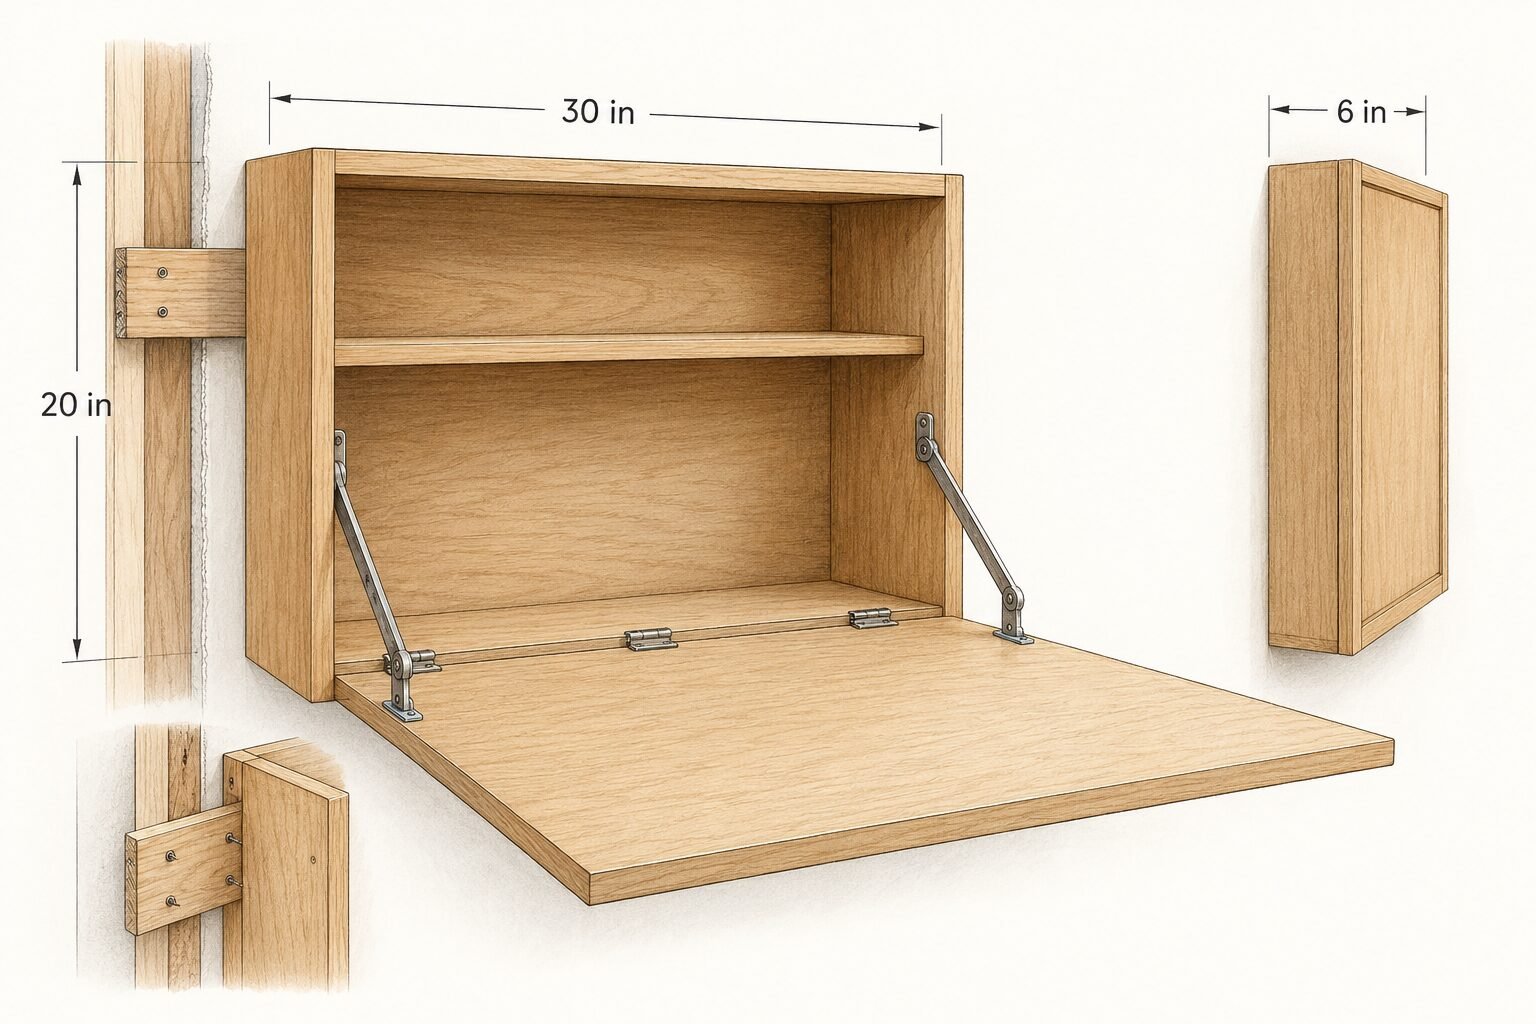
Folding laundry station plans: before you begin
Good folding laundry station plans begin with the wall structure, appliance clearances and a comfortable working height measured in the real room.
Read the complete project once and compare its finished size with the real location. Measure the actual material and hardware instead of relying only on nominal sizes. Prepare a flat assembly surface, label every part and practice unfamiliar cuts on scrap.
Materials for folding laundry station plans
Choose flat cabinet-grade material and hardware rated for the expected load; folding laundry station plans depend on a square cabinet, a straight hinge and two matched supports.
- Flat cabinet-grade plywood or straight, dry hardwood
- Project-appropriate hardware, screws and wood glue
- Saw with a sharp suitable blade and drill/driver
- Square, tape measure, clamps and sanding equipment
- Eye, hearing and dust protection
Cut list for 3/4 in cabinet material
- 2 sides — 20 × 6 in
- Top and bottom — 28 1/2 × 6 in
- Interior shelf — 28 1/2 × 5 1/4 in
- Folding panel — 29 3/4 × 19 1/2 in
- 2 mounting rails — 28 1/2 × 3 in
- 1/4 in back panel — 30 × 20 in
These dimensions create the stated 30 × 20 × 6 in closed cabinet. Confirm the hinge, support clearances and actual plywood thickness before cutting the folding panel.
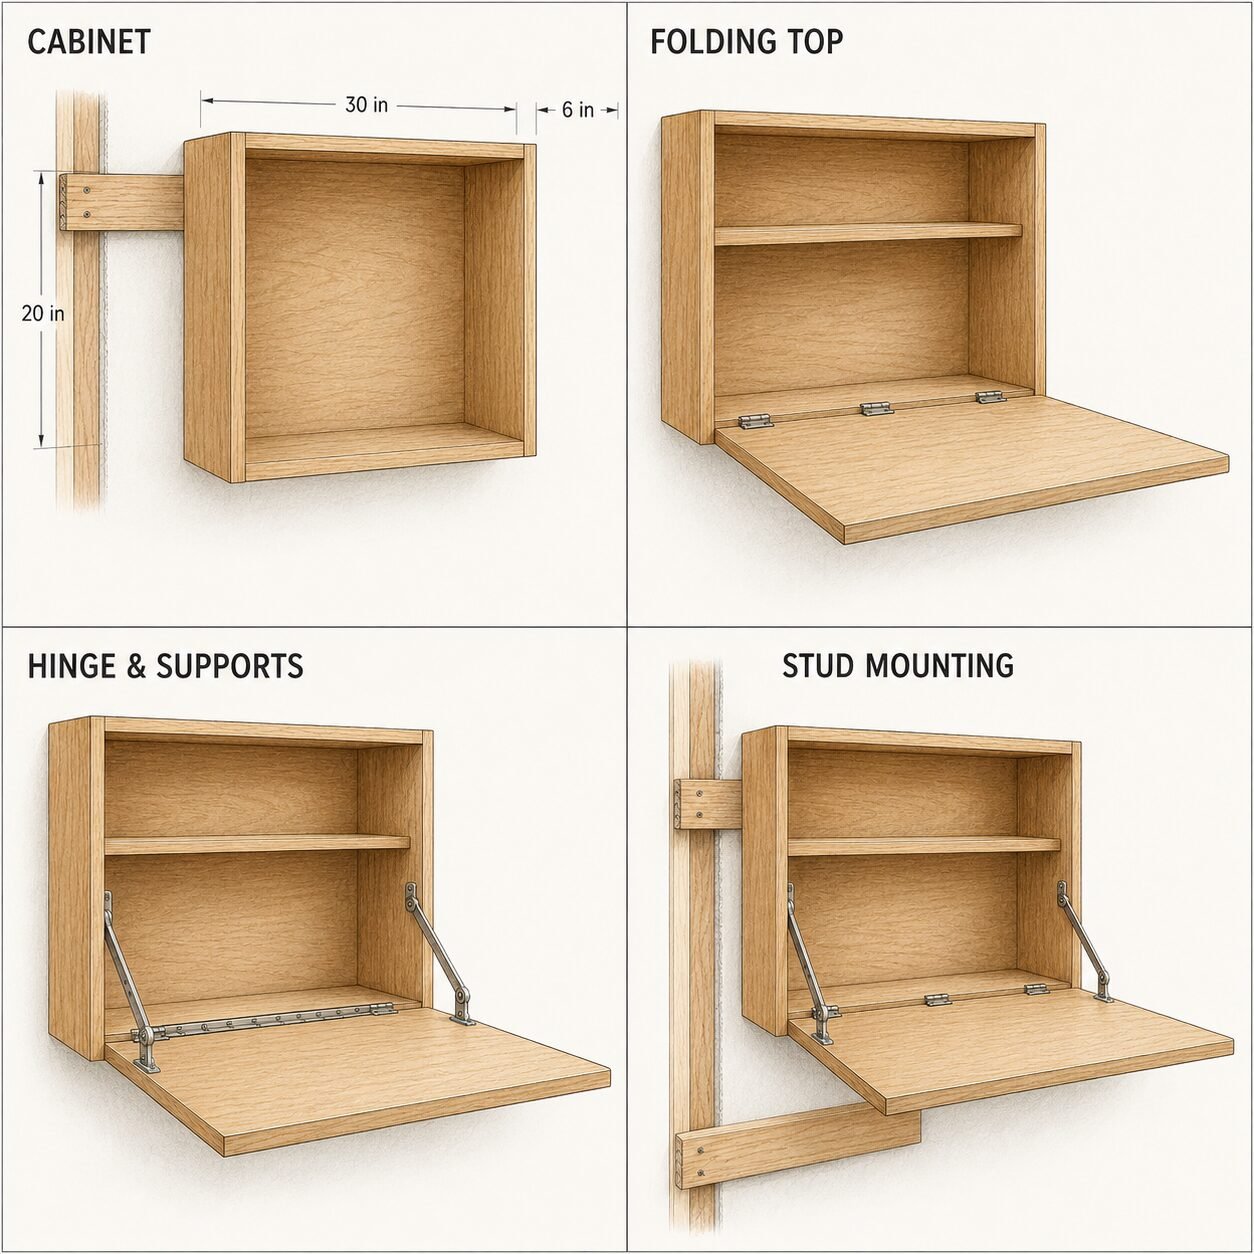
1. Choose a safe mounting location
The first decision in folding laundry station plans is the mounting position because it controls the finished height, opening path and structural fixing points.
Locate structural studs and check for plumbing, wiring, doors and appliances. Set the open work surface at a comfortable height and make sure it cannot obstruct a walkway. Do not depend on drywall anchors for the working load.
Mark the cabinet outline on the wall with painter’s tape, then open nearby doors and appliances to confirm the panel will have a clear working zone. Mark the center of every verified stud so the mounting screws land in structural framing.
2. Build the shallow cabinet square
Cut the sides, top, bottom and back or mounting rails from flat material. Assemble on a level surface and compare diagonals. A square cabinet keeps the folding panel gaps even and lets both supports share the load.
Pre-drill the plywood edges, apply a thin continuous bead of glue and clamp the box before driving the screws. Measure both diagonals; adjust the clamps until the two readings match before the glue begins to set.
3. Add the shelf and folding panel
Fit the interior shelf before the front panel restricts access. Cut the folding surface from stable sheet material, seal both faces and ease the front edge so it feels comfortable during repeated use.
Allow a consistent 1/8 in clearance around the folding panel and test the shelf position with the products you expect to store. Sand and seal the panel before installing the hinge, while every face is still easy to reach.
4. Install the hinge and rated supports
Position the continuous hinge from a centered reference line. Fit paired supports at matching heights and follow their manufacturer instructions. Cycle the panel slowly with temporary screws before final tightening.
Lay out the hinge holes from the center outward and pre-drill every screw location. Install both folding supports at the same height and confirm that each one locks fully without twisting the panel.
5. Mount to studs and load-test gradually
Level the cabinet and fasten the mounting rails directly into structural framing with appropriate hardware. Test the empty panel first, then add weight gradually while watching the cabinet, fasteners and both supports.
Use structural screws sized for the wall construction and tighten them gradually while checking level. Begin the load test with 10 lb, then increase in small steps without exceeding the lowest hardware rating.
Most problems with folding laundry station plans come from weak wall anchors, uneven supports or a panel that was sized before the hinge clearance was tested.
Common mistakes to avoid
- Building from nominal sizes without measuring the real stock and hardware.
- Moving the reference edge between related parts.
- Skipping the dry fit before glue or final fasteners.
- Forcing a twisted assembly instead of locating the inaccurate component.
- Applying finish before movement and load tests are complete.
Safety and final inspection
Support every workpiece, disconnect power before changing blades or bits and follow the instructions supplied with tools and hardware. Inspect fasteners, sharp edges and moving parts before use. Wall-mounted work must be fixed to a verified structural substrate; ask a qualified person when the wall construction or expected load is uncertain.
These folding laundry station plans can be adapted, but every connected panel, hinge position and support rating must be checked again after a dimension changes.
For general machine and workshop hazards, consult the OSHA woodworking safety guide.
Frequently asked questions
Can I change the dimensions?
Yes, but update every connected part together and recheck spans, clearances, hardware travel and stability before cutting.
Is this suitable for a beginner?
A careful beginner can complete the project after practicing critical joints on scrap. Moving and wall-mounted hardware deserves extra review.